Fermenting Hot Sauce at Home: A Beginner Guide
Fermenting Hot Sauce at Home: A Beginner’s Guide
If you’ve ever looked at a bottle of artisan hot sauce with a $12 price tag and thought “I could make that,” you’re absolutely right — and the homemade version will be better. Fermenting hot sauce at home is one of the most satisfying kitchen projects a homesteader can take on. It transforms simple peppers and salt into a complex, tangy, probiotic-rich condiment with layers of flavor that no commercial hot sauce can match.
The process is surprisingly simple: chop peppers, add salt, wait. That’s the essence of lacto-fermentation, the same ancient technique used to make sauerkraut, kimchi, and pickles. Beneficial Lactobacillus bacteria — already present on the peppers — convert sugars into lactic acid, preserving the peppers while developing incredible depth of flavor. No vinegar, no cooking, no special equipment. Just time, salt, and peppers.
- Fermented hot sauce uses lacto-fermentation (salt + time) rather than vinegar for preservation and flavor
- The basic ratio is 2-3% salt by weight of peppers — too little risks spoilage, too much slows fermentation
- Fermentation takes 5-14 days at room temperature, with longer aging producing more complex flavors
- Any pepper variety works — mix sweet and hot peppers to control heat level and build flavor complexity
- Finished sauce keeps for months refrigerated and can be further preserved with added vinegar
Why Fermented Hot Sauce Is Better
Most commercial hot sauces use vinegar as their primary preservation method. They’re cooked, bottled, and rely on acetic acid for shelf stability. This works fine, but vinegar-based sauces tend to have a one-dimensional tang that can overwhelm the actual pepper flavor.
Fermented hot sauce is different. The lactic acid produced during fermentation creates a more rounded, complex tanginess — think of the difference between plain vinegar and aged cheese. The fermentation process also develops umami flavors, breaks down the raw pepper taste into something mellower and deeper, and preserves the bright color and fresh pepper character that cooking destroys.
There’s also the probiotic benefit. Like all lacto-fermented foods, fermented hot sauce is alive with beneficial bacteria that support gut health. If you’re already exploring fermentation basics with sauerkraut or pickles, hot sauce is a natural next step that uses the exact same principles.
I started fermenting hot sauce three years ago when my pepper plants went absolutely wild and I had more habaneros and cayennes than I knew what to do with. That first batch — just peppers, garlic, and salt fermented for two weeks — completely ruined me for store-bought hot sauce. The flavor was so much more complex, with this beautiful tangy heat that built slowly instead of just blasting your tongue. Now I make 15-20 bottles every fall and give them as gifts. People genuinely ask me when the next batch is ready.
Choosing Your Peppers
The beauty of homemade hot sauce is that you control the heat level, flavor profile, and color. Understanding your pepper options is the first step toward creating your signature sauce.
Hot Pepper Options
| Pepper | Scoville Heat Units | Flavor Profile | Best For |
|---|---|---|---|
| Cayenne | 30,000-50,000 | Clean, sharp heat | Classic Louisiana-style sauce |
| Jalapeno | 2,500-8,000 | Bright, grassy | Mild everyday sauce |
| Serrano | 10,000-25,000 | Crisp, bright | Medium-heat all-purpose sauce |
| Habanero | 100,000-350,000 | Fruity, tropical | Caribbean-style fruit-forward sauce |
| Thai Bird’s Eye | 50,000-100,000 | Sharp, peppery | Asian-inspired sauce |
| Fresno | 2,500-10,000 | Smoky, slightly sweet | Sriracha-style sauce |
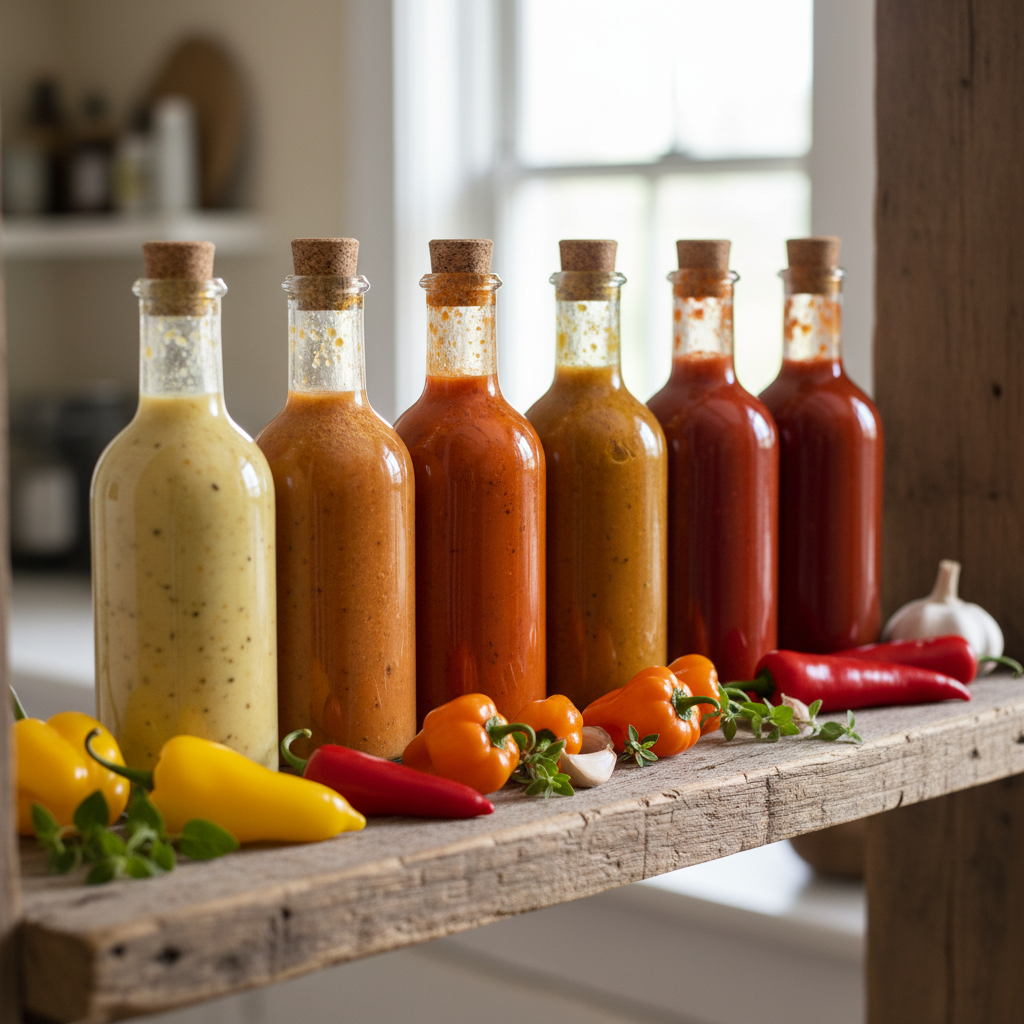
For your first batch, I recommend a mix of peppers rather than a single variety. A combination like 60% cayenne and 40% habanero gives you heat with complexity. Or try 50% jalapeno, 30% serrano, and 20% sweet red pepper for a milder sauce with beautiful color and layered flavor. If you grow your own peppers, you probably already have a mix of varieties available — use whatever you have in abundance.
Adding Flavor Depth
Beyond peppers, several additions can take your sauce from good to incredible. Garlic is almost essential — it ferments beautifully and adds a mellow sweetness. Onion or shallot provides body and savory depth. Fresh fruit like mango, peach, or pineapple adds sweetness and complexity (and ferments wonderfully). Carrots are a secret weapon for adding body, color, and natural sweetness without diluting the heat.
The Basic Fermented Hot Sauce Process
Equipment You’ll Need
The equipment list is refreshingly short: a glass jar (quart or half-gallon size), a kitchen scale, a knife and cutting board, a blender or food processor, and bottles for the finished sauce. An airlock lid is nice but not essential — a regular lid loosely placed works fine. A fermentation weight to keep peppers submerged is helpful but a zip-lock bag filled with brine works as an improvised weight.
Step 1: Prepare the Peppers
Wash your peppers and remove the stems. You can leave the seeds in (they don’t significantly affect heat but add texture) or remove them for a smoother sauce. Roughly chop the peppers into pieces — they don’t need to be uniform since you’ll be blending everything later. If adding garlic, peel and halve the cloves. Weigh your total prepared ingredients.
Important: Wear gloves when handling hot peppers, and do your chopping in a well-ventilated area. The capsaicin oils can burn skin on contact and irritate lungs if the fumes are concentrated. This is especially true with habaneros and hotter varieties.
Step 2: Salt the Mash
Calculate 2-3% of the total weight of your prepared ingredients and measure out that amount of salt. For example, if you have 500 grams of chopped peppers and garlic, you need 10-15 grams of salt (about 2-3 teaspoons). Use non-iodized salt — sea salt, kosher salt, or pickling salt. Iodine can inhibit fermentation.
You have two approaches here. The mash method involves processing the peppers in a food processor to a rough paste, mixing in the salt, and packing the mash into a jar. The brine method involves packing whole or halved peppers into a jar and covering them with a 3-5% salt brine. Both work, but the mash method is more common for hot sauce because it ferments faster and produces a smoother final product.
Pack the mash firmly into your jar, pressing out air pockets. Leave at least an inch of headspace — the ferment will bubble and expand. If using the mash method, the salt will draw moisture from the peppers within a few hours, creating its own brine. Press down so the mash is submerged under liquid.
Step 3: Ferment
Place a weight on top of the mash to keep it submerged under brine. Exposure to air encourages mold, while submerged in brine the fermentation stays clean. Cover the jar with an airlock lid, a loose regular lid, or cheesecloth secured with a rubber band. Place the jar on a plate or in a bowl to catch any overflow.
Set the jar in a spot out of direct sunlight at room temperature — 65-75°F is ideal. Within 24-48 hours, you should see bubbles forming in the mash. This is the fermentation actively producing CO2, and it means everything is working exactly as it should.
Burp the jar daily if using a regular lid (open it briefly to release built-up gas). Check that the mash stays submerged. If any white film (kahm yeast) appears on the surface, skim it off — it’s harmless but can affect flavor. True mold (fuzzy, colored) is rare if the mash stays submerged, but if it appears, scrape it off. If mold penetrates below the surface, discard the batch.
Step 4: Taste and Wait
Fermentation time is flexible and depends on your taste preference. At 5-7 days, you’ll have a lightly fermented sauce with bright pepper flavor and mild tang. At 2-3 weeks, the flavor deepens with more acidity and complexity. At 4-8 weeks, you get deep, complex flavors with pronounced tang — closer to what you’d find in premium artisan sauces.
Taste your ferment every few days starting around day 5. When you like the balance of heat, tang, and pepper flavor, it’s time to blend. There’s no wrong answer here — it’s entirely about your preference.
My favorite discovery has been that longer isn’t always better with fermented hot sauce. My 7-day habanero-mango sauce is bright, fruity, and fresh — perfect for tacos and eggs. My 6-week cayenne sauce is deep, funky, and complex — incredible on pizza and in stews. They’re completely different products, and I love them both. Now I start multiple small batches at different times and pull them at different stages. It’s like having a hot sauce cellar.
Step 5: Blend and Bottle
Transfer the fermented mash to a blender. For a thinner, pourable sauce, add some of the fermentation brine, vinegar, or a combination of both. Blend until smooth. For a thicker sauce, use less liquid. Strain through a fine mesh sieve for a silky smooth sauce, or leave it unstrained for a rustic texture with more body.
Taste and adjust. You can add more salt, a splash of vinegar for extra tang and longer shelf life, a pinch of sugar to round out the heat, or additional garlic. Some people add a small amount of xanthan gum to prevent separation in the bottle, but it’s purely cosmetic — separation is natural and a quick shake fixes it.
Pour the finished sauce into clean bottles. Swing-top bottles, recycled hot sauce bottles, or any glass bottle with a tight lid works. Label with the pepper variety, fermentation date, and any tasting notes.
Storage and Shelf Life
Fermented hot sauce keeps well thanks to its low pH from the lactic acid. Refrigerated, it will last 6 months to a year or more. The flavor continues to evolve slowly in the fridge — most people find it peaks at about 2-3 months after blending.
For even longer shelf life, add vinegar to the finished sauce (start with 1 tablespoon per cup and adjust to taste). The additional acid extends storage life and adds another layer of tang. Many commercial fermented hot sauces include some vinegar for exactly this reason.
If you want shelf-stable sauce that doesn’t need refrigeration, you can process bottles in a hot water bath, but this kills the beneficial bacteria and changes the flavor somewhat. For most homesteaders, the refrigerator method is simplest and preserves the live culture benefits.
Recipe Variations to Try
Smoky Chipotle Style
Start with dried chipotle peppers (smoked jalapenos) rehydrated in warm water. If you enjoy dehydrating your own produce, you can smoke and dry your own jalapenos for an even more authentic flavor. Ferment with garlic and a touch of tomato paste. The result is a rich, smoky, deeply savory sauce.
Caribbean Mango Habanero
Ferment habaneros with ripe mango chunks, garlic, and a small piece of fresh ginger. The mango sugars feed the fermentation beautifully, and the result is a fruity, tropical sauce with serious heat. It’s incredible on grilled fish and chicken.
Green Jalapeño Sauce
Use green jalapenos with tomatillos, garlic, and cilantro stems. Ferment for 5-7 days for a bright, fresh green sauce that’s perfect for tacos, burritos, and eggs. This is the fermented version of a classic salsa verde.
Garlic Lover’s Sauce
Use an equal weight of garlic and peppers. It sounds like too much garlic, but fermentation transforms raw garlic into something mellow, sweet, and deeply savory. Cayenne peppers work best here. The result is addictively garlicky with a clean heat.
Using Your Hot Sauce Pepper Harvest
If you’re growing peppers specifically for hot sauce, plan for abundance. A single hot sauce batch uses about 1-2 pounds of peppers, and most pepper plants produce 2-5 pounds per season. Four or five cayenne plants and a couple of habanero plants will give you enough peppers for a year’s worth of hot sauce, plus plenty for fresh eating.
If your pepper harvest comes in all at once and you can’t ferment it all immediately, peppers freeze beautifully. Just wash, stem, and freeze them whole in freezer bags. They’ll be slightly soft when thawed but work perfectly for fermented hot sauce since you’re processing them anyway. Setting up a preserver’s garden with your favorite pepper varieties ensures a reliable supply year after year.
Another option for preserving excess peppers is making compound butters with finely minced fresh peppers mixed into softened butter. Freeze in logs and slice off rounds whenever you want to add instant heat and richness to a dish.
Troubleshooting Your Ferment
No bubbles after 48 hours: Your environment may be too cold. Move the jar to a warmer spot (68-75°F is ideal). If temperatures are correct, add a tiny pinch more salt to encourage the right bacteria. Also check that you used non-iodized salt.
White film on the surface: This is usually kahm yeast, which is harmless but can impart off flavors. Skim it off and ensure the mash is fully submerged under brine. It’s more common in warmer environments and with sweeter pepper mixes.
Sauce is too salty: You may have used more than 3% salt. Dilute with a bit of water or vinegar when blending. In future batches, weigh your salt precisely using a scale rather than measuring by volume.
Sauce is too thin: Use less liquid when blending, or add roasted carrots or roasted sweet peppers for body. You can also simmer the blended sauce briefly to reduce it, though this will kill the probiotics.
Flavor is too funky: Extended fermentation in warm conditions can produce very strong flavors. For a mellower sauce, ferment for less time or in a cooler spot. Adding vinegar or fresh pepper puree when blending can balance overly fermented flavors.
Building Your Hot Sauce Collection
Once you get comfortable with the basic process, the creative possibilities are endless. Start a rotation of sauces with different heat levels, flavor profiles, and fermentation lengths. Label everything carefully — including detailed notes about what worked and what you’d change. Over time, you’ll develop signature recipes that become your household staples and most requested gifts.
Many homestead hot sauce makers eventually start selling at farmers’ markets or to local restaurants. A truly excellent fermented hot sauce is a genuinely valuable artisan product, and the markup from raw peppers to finished sauce is substantial. It’s one of the highest-value products you can make from a home garden.
Frequently Asked Questions
Is fermented hot sauce safe? Can I get botulism?
Fermented hot sauce is very safe when made properly. The salt concentration and the lactic acid produced during fermentation create an environment where harmful bacteria, including Clostridium botulinum, cannot survive. Botulism thrives in low-acid, anaerobic, low-salt environments — the exact opposite of a properly made ferment. As long as you use the right salt ratio (2-3%) and allow fermentation to develop sufficient acidity, the risk is essentially zero. This is one of humanity’s oldest preservation methods for a reason.
How hot will my fermented sauce be compared to fresh peppers?
Fermentation doesn’t reduce the capsaicin content (heat) of peppers, but many people perceive fermented hot sauce as slightly less aggressively hot than raw peppers. The complex flavors developed during fermentation seem to balance the heat perception. The sauce is still hot — you’re just tasting more than just heat. If you want a milder sauce, mix hot peppers with sweet peppers like red bells or sweet banana peppers.
Can I ferment dried peppers?
Yes, though the process is slightly different. Rehydrate dried peppers in warm water for 30 minutes, then process into a paste with the soaking liquid and salt. Dried peppers ferment more slowly because much of their natural bacteria was killed during drying, but they’ll still ferment successfully. Some of the best sauces combine dried peppers (for smoke and depth) with fresh ones (for brightness and bacterial activity).
What if I don’t like the taste at any point during fermentation?
Flavor changes dramatically throughout fermentation. If it tastes too raw at day 5, wait another week. If it’s too mild, let it go longer. If it’s developing off flavors or tastes genuinely unpleasant (not just sour), something may have gone wrong — check for contamination. But generally, patience is rewarded. Most batches that taste questionable at one week taste fantastic at three weeks. You can always blend early and adjust with vinegar or fresh ingredients.
Do I need to use organic peppers?
Organic isn’t strictly necessary, but it’s preferred. Pesticide residues on conventionally grown peppers can potentially inhibit the beneficial bacteria needed for fermentation. If using non-organic peppers, wash them very thoroughly. If using homegrown peppers — which most homesteaders are — you already know exactly what went on them. Garden-grown peppers with no synthetic pesticides are ideal for fermentation.