Your January Homestead Guide: What to Do This Month
- Order seed catalogs and sketch your garden layout now, before the rush
- Start a small indoor herb garden to stay connected to growing season
- Sharpen and oil every tool before spring mud arrives
- Inspect root cellar and pantry stores; rotate and use what’s aging
- Plan crop rotation and start cool-season seeds indoors by mid-month
- Prune dormant fruit trees on dry, above-freezing days
- Check chicken coop for drafts and insulation gaps
- Set your spring project list and rough budget while you have the time
There’s a quiet on the homestead in January that can fool you into thinking nothing needs doing. The beds are frozen, the animals are hunkered down, and the light is thin. But veteran homesteaders know that January is among the most important months of the year, not for doing, but for planning. The seeds you order this week, the rotation diagram you sketch tonight, the tool edge you put back on a dull hoe, these decisions shape every harvest you’ll bring in from March through November. The garden is resting, but you shouldn’t be idle.
This guide walks through ten high-value January tasks, each explained in enough depth that you can act on them today. Whether you’re in your first winter or your fifteenth, there’s always a way to use these cold weeks wisely.
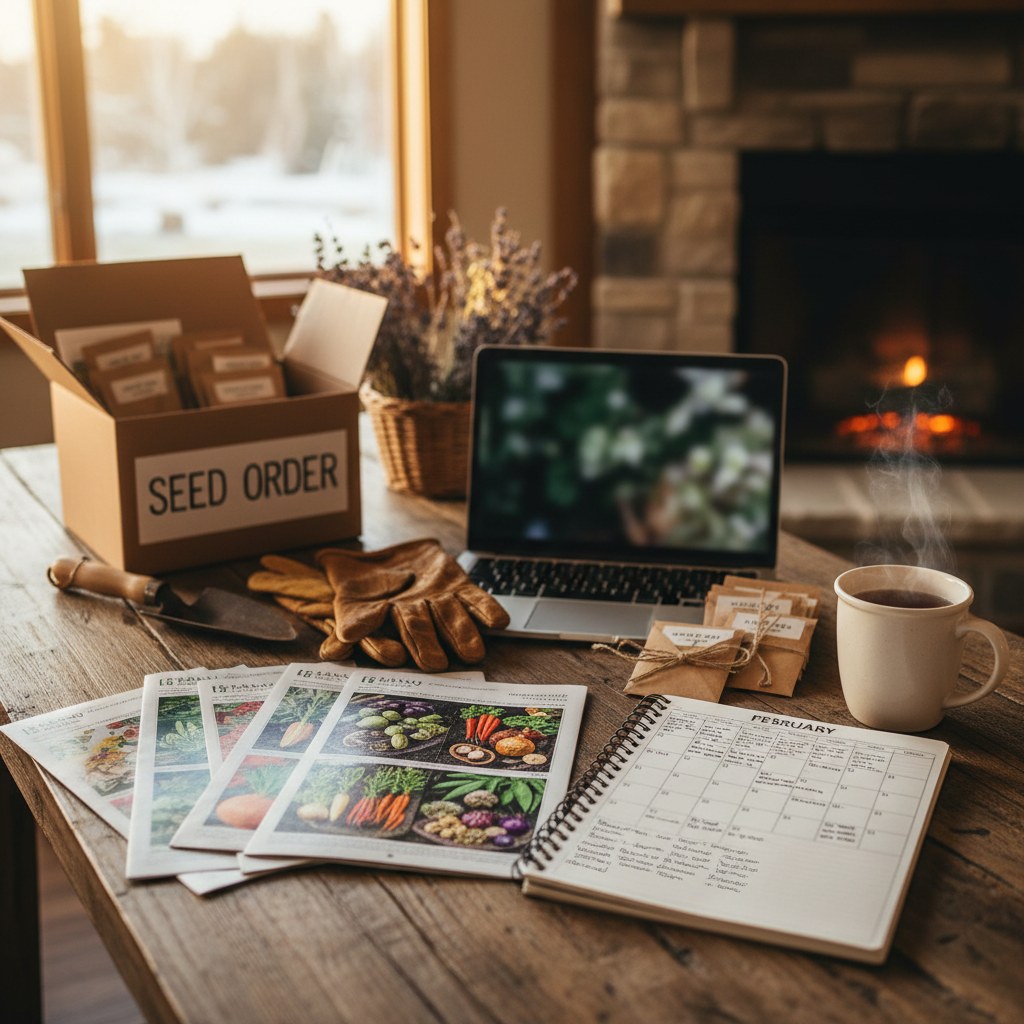
Order Seed Catalogs and Plan Your Garden Layout
January is peak catalog season, and for good reason: the most desirable open-pollinated and heirloom varieties sell out by February. Ordering early: or at minimum, sitting down with the catalogs you already have, lets you compare varieties, check days-to-maturity against your frost dates, and make deliberate choices rather than panic-buying whatever’s left in March.

Start by pulling last year’s notes (or starting a notebook if you haven’t been keeping one). What underperformed? What surprised you? Use that as your filter when flipping through catalogs. Request paper catalogs from three to five seed companies. Baker Creek, Fedco, Johnny’s Selected Seeds, Territorial Seed, and High Mowing are all excellent starting points depending on your region. Many are free.
Once you have your variety list roughed out, sketch a garden layout on grid paper or a free tool like the USDA’s garden planner. Assign each bed based on last year’s crop families, you’ll refine this when you reach the crop rotation section below, but having a rough map early saves a lot of second-guessing later. Account for sun patterns, water access, and which beds tend to stay wet in spring. This sketch is a living document; revise it freely through January and February.
“Planning is the work that makes all other work possible.”, common wisdom among experienced market gardeners
Source: University of Minnesota Extension. Starting a Vegetable Garden
Start an Indoor Herb Garden
One of the best cures for winter homestead restlessness is a windowsill herb garden. Starting herbs indoors in January gives you fresh flavor for cooking well before the last frost, keeps your hands in soil during a season when that’s otherwise impossible, and gives tender perennials like rosemary and lemon verbena a head start on the growing season.
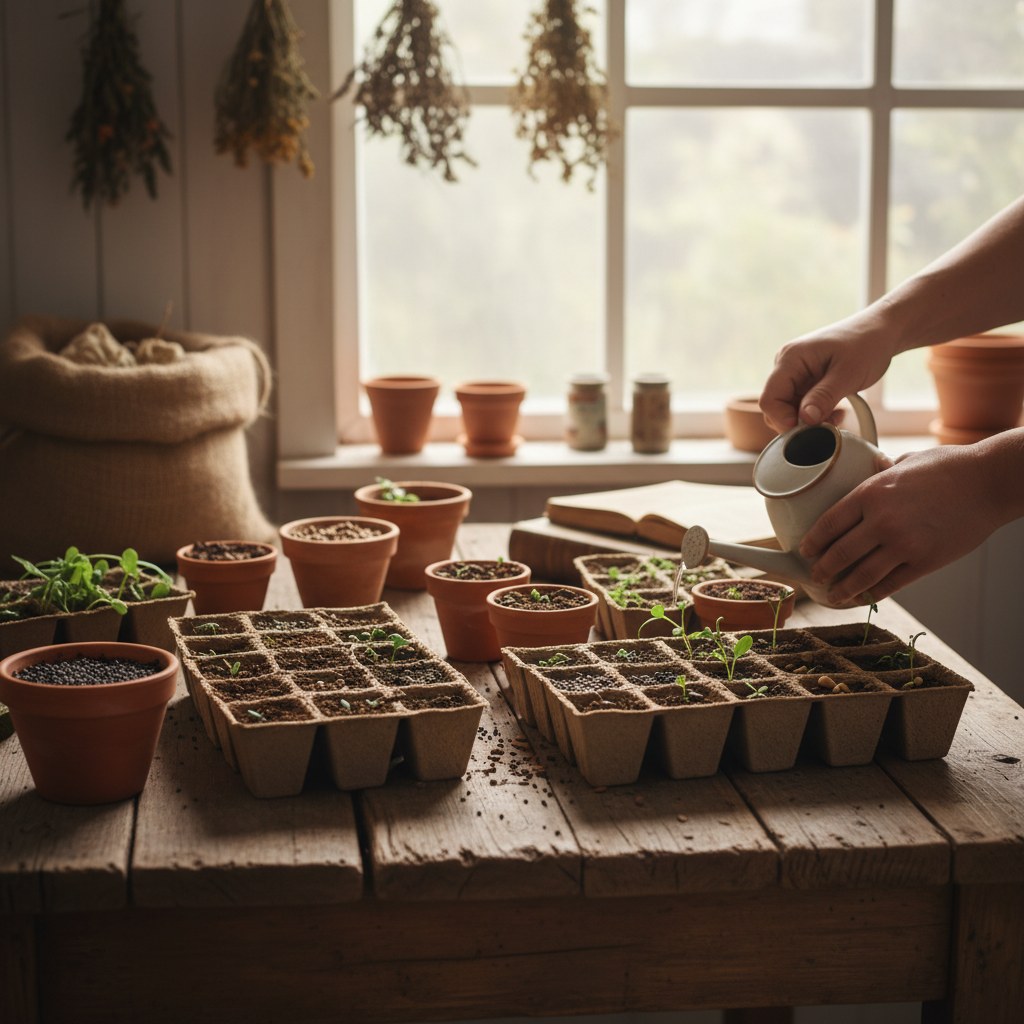
Choose a south-facing window for maximum light, or supplement with a simple grow light hung 3–4 inches above the seedlings on a 14-hour timer. Good candidates for January indoor starts include basil, parsley, chives, cilantro, thyme, and oregano. Use a quality seed-starting mix, not garden soil, which compacts and harbors fungus gnats indoors. Small terracotta pots or repurposed yogurt containers with drainage holes work perfectly.
Sow seeds at roughly twice the depth of their diameter, water gently from below to avoid disturbing seeds, and keep the mix consistently moist but not waterlogged. Most herbs germinate in 7–14 days at 65–70°F. Once seedlings have their first true leaves, begin fertilizing lightly with a diluted fish emulsion every two weeks. By the time you’re direct-sowing outdoors, these plants will be robust and ready to transplant, or you can keep them on the sill and harvest all season.
Source: Clemson Cooperative Extension. Growing Herbs Indoors
Review, Sharpen, and Oil Your Tools
Nothing slows down early spring work like reaching for a hoe and finding a rusted blade with a loose handle. January is the ideal month for a full tool audit, you’re not pressed for time, everything is accessible, and a good sharpening job now means your tools are ready the moment soil is workable.
Pull every hand tool out of storage and inspect each one. Check wooden handles for cracks, splinters, or looseness at the ferrule. Tighten or replace as needed, a loose handle on a mattock or axe is a genuine safety hazard. Sand rough handles smooth and rub them with linseed oil; let it soak in overnight, then wipe off the excess. This prevents cracking and makes handles comfortable to grip even in cold weather.
For metal blades, hoes, spades, trowels, pruners, knock off any rust with a wire brush or coarse steel wool, then sharpen with a mill bastard file or whetstone. Hold the file at the existing bevel angle (usually 20–45 degrees depending on tool type) and push forward in smooth strokes. A properly sharpened hoe slices through weeds with very little effort; a dull one bludgeons. After sharpening, wipe all metal surfaces with a rag lightly oiled with mineral oil or WD-40 to prevent re-rusting during storage.
Keep a running list as you go. If a tool is beyond repair, note it now so you can budget for a replacement before planting season rather than making an emergency hardware store run in April.
Source: Oregon State University Extension. How to Sharpen Garden Tools
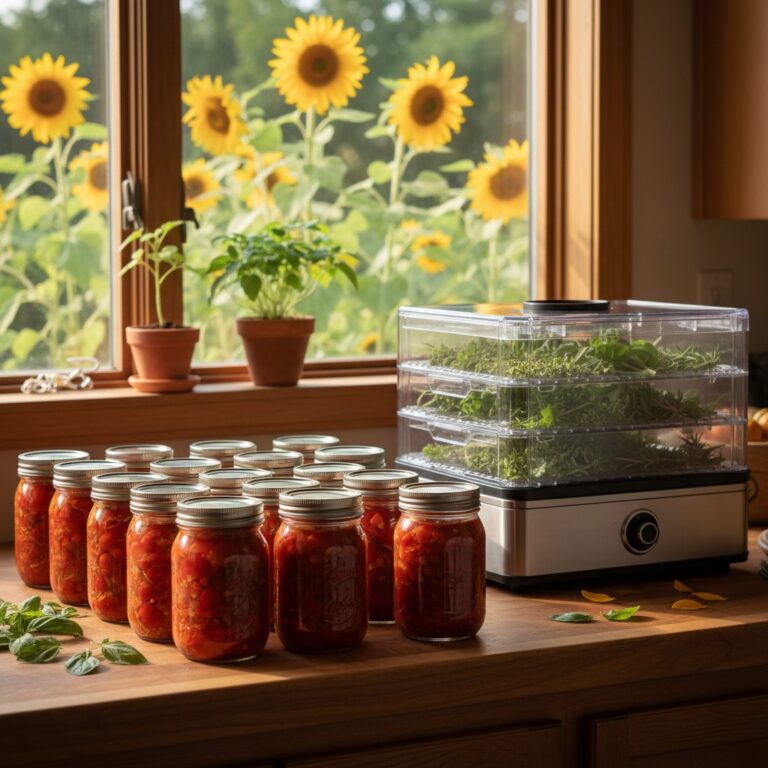
Check Your Stored Harvest. Root Cellar and Pantry Audit
If you put up a harvest last year, canned tomatoes, dried beans, cured sweet potatoes, stored winter squash, jars of pickles. January is a critical time to check on everything. Approximately the halfway point of winter storage, this month is when problems that weren’t obvious in November become hard to miss: soft spots on stored roots, unsealed jar lids, squash with soft patches, or onions beginning to sprout.
Walk through your root cellar or storage area with a flashlight. Check every squash and sweet potato for soft spots or mold; remove any affected ones immediately before they spread to neighbors. Turn cured onions and garlic, pulling any that are sprouting or feel soft at the neck. Check potato bins for greening or sprouts, remove sprouts but potatoes that are otherwise firm are still good. Smell-test your root cellar: a strong off-odor usually indicates something rotting that you haven’t found yet.
In the pantry, rotate your canned goods. Any jar that has lost its seal, the lid flexes up and down when pressed, should be discarded or refrigerated and used immediately. Check the date on home-canned goods: the USDA recommends using home-canned foods within one year for best quality. Use older jars first, moving them to the front. Make a note of what you’re running low on to inform how much you’ll grow and preserve next season.
This audit is also motivating in the best way. Seeing a full pantry in January is deeply satisfying. Seeing gaps tells you exactly what to prioritize in the garden this year.
Source: National Center for Home Food Preservation. Storing Home Canned Foods
Plan Your Crop Rotation
Crop rotation is among the most effective low-cost strategies for maintaining soil health and reducing pest and disease pressure, and it takes only an hour or two to plan in January when you’re not rushing to get seeds in the ground.
The basic principle: don’t grow the same crop family in the same bed two years in a row. The main plant families to rotate are nightshades (tomatoes, peppers, eggplant), brassicas (cabbage, broccoli, kale, kohlrabi), alliums (onions, garlic, leeks), legumes (beans, peas), and cucurbits (cucumbers, squash, melons). Each family has specific soil-borne diseases and pests that persist in the soil; rotating them denies those pathogens a continuous host.
A simple four-bed rotation works well for most homestead gardens: Year 1 legumes → Year 2 brassicas → Year 3 nightshades or cucurbits → Year 4 root crops or alliums, then repeat. If you have more beds, the cycle can be longer and more nuanced. What matters is write it down so you’re not relying on memory each spring.
Also note where you added amendments last year, manure, compost, wood ash. Heavy nitrogen applications benefit leafy crops most; rotating heavy feeders like corn and brassicas into recently manured beds while following with lighter feeders makes efficient use of what you’ve already added to the soil.
Source: Royal Horticultural Society. Crop Rotation
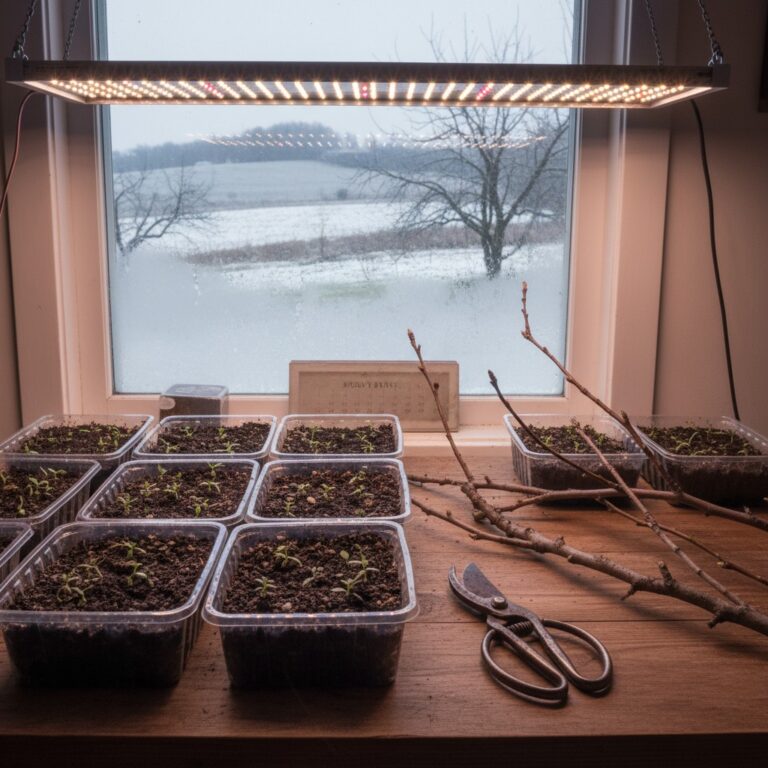
Start Cool-Season Seeds Indoors
Most gardeners think of seed starting as a March or April task, but cool-season crops, those that thrive in temperatures between 45°F and 65°F and can tolerate light frost, benefit enormously from a January or early February indoor start. Getting them going now means they’ll be hardened, stocky transplants ready to go into the ground as soon as it can be worked, often 4–6 weeks before your last frost date.
Good candidates for January indoor starts include onions (which need 10–12 weeks), leeks (12–14 weeks), celery (10–12 weeks), and head lettuce (6–8 weeks). Brassicas like broccoli and cabbage can be started in late January for a very early spring transplant, though they can also wait until February. Check the days-to-transplant on your seed packets, then count back from your average last frost date to determine your start windows.
Use a sterile seed-starting mix, sow at the correct depth, and provide bottom heat with a seedling heat mat (65–70°F soil temp speeds germination for most vegetables). Once seeds sprout, move them under strong light immediately, a windowsill alone is rarely enough and will produce leggy, weak seedlings. Fluorescent or LED shop lights work well and are inexpensive. Aim for 14–16 hours of light per day.
For a full step-by-step walkthrough of the seed-starting process, see our guide: Seed Starting Indoors: A Beginner’s Step-by-Step Guide.
Source: Penn State Extension. Starting Seeds Indoors
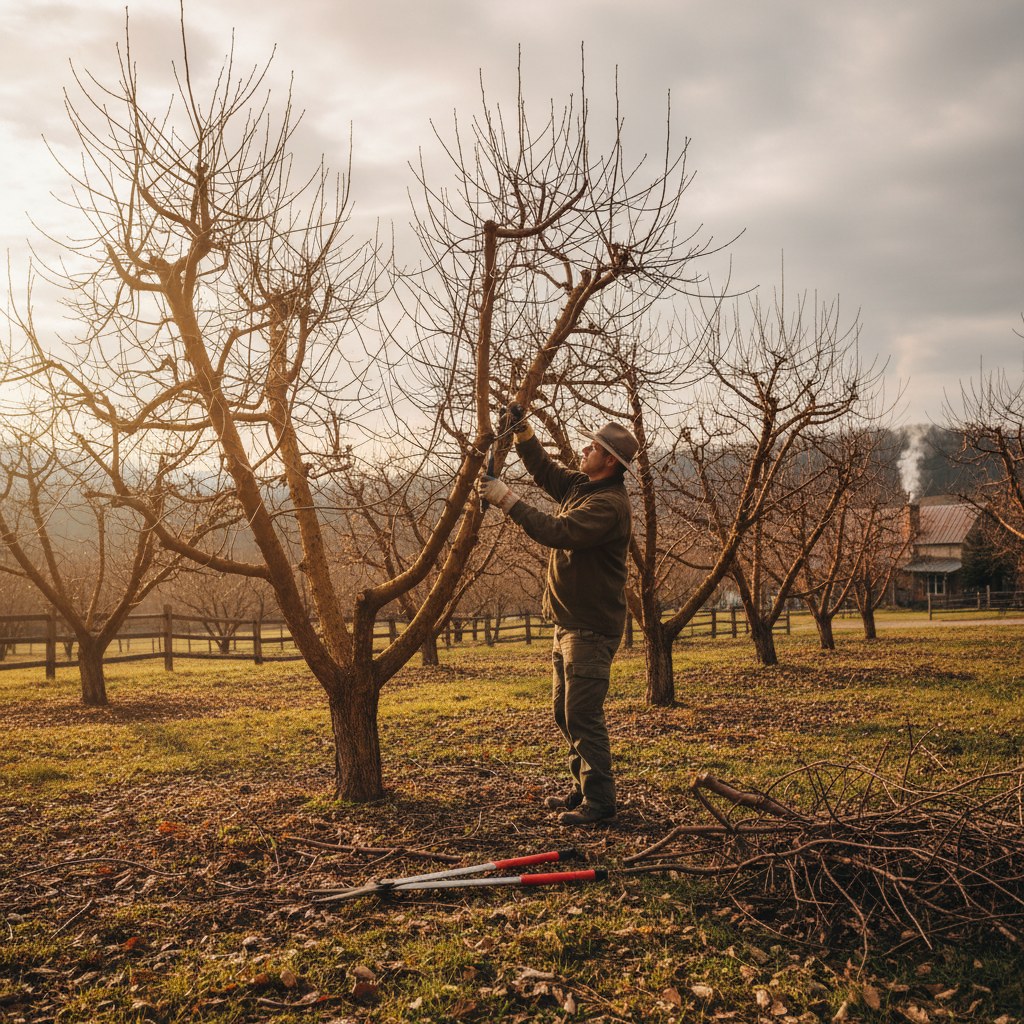
Prune Dormant Fruit Trees
Dormant pruning: cutting fruit trees while they’re fully dormant, before any bud swell, is among the most impactful things you can do for long-term orchard health and productivity. January and early February are the ideal window in most temperate climates, though you should wait for a dry day with temperatures above 28°F to avoid frost damage to fresh cuts.
Dormant pruning serves several purposes: it removes dead, diseased, or crossing branches; opens the canopy to light and air circulation (which dramatically reduces fungal disease pressure); directs the tree’s energy toward fewer, larger, higher-quality fruits; and controls size so the tree stays manageable for harvesting and spraying.
For most backyard fruit trees, focus on the three Ds first, dead, damaged, diseased, then remove any branches that rub or cross through the center of the canopy. On apples and pears, remove vigorous vertical shoots (called water sprouts) that grow straight up from major branches; they rarely fruit well and shade out lower productive wood. Step back often to assess overall shape. You’re aiming for an open vase or modified central leader form depending on species, with light able to reach all parts of the canopy.
Use sharp, clean pruning shears for cuts up to ¾ inch, loppers for ¾–1½ inch, and a pruning saw for anything larger. Make cuts just outside the branch collar, the slight swelling where branch meets trunk, to allow proper wound closure. You don’t need wound sealant on most cuts; research shows it often does more harm than good by trapping moisture.
Source: University of Maryland Extension. Pruning Fruit Trees
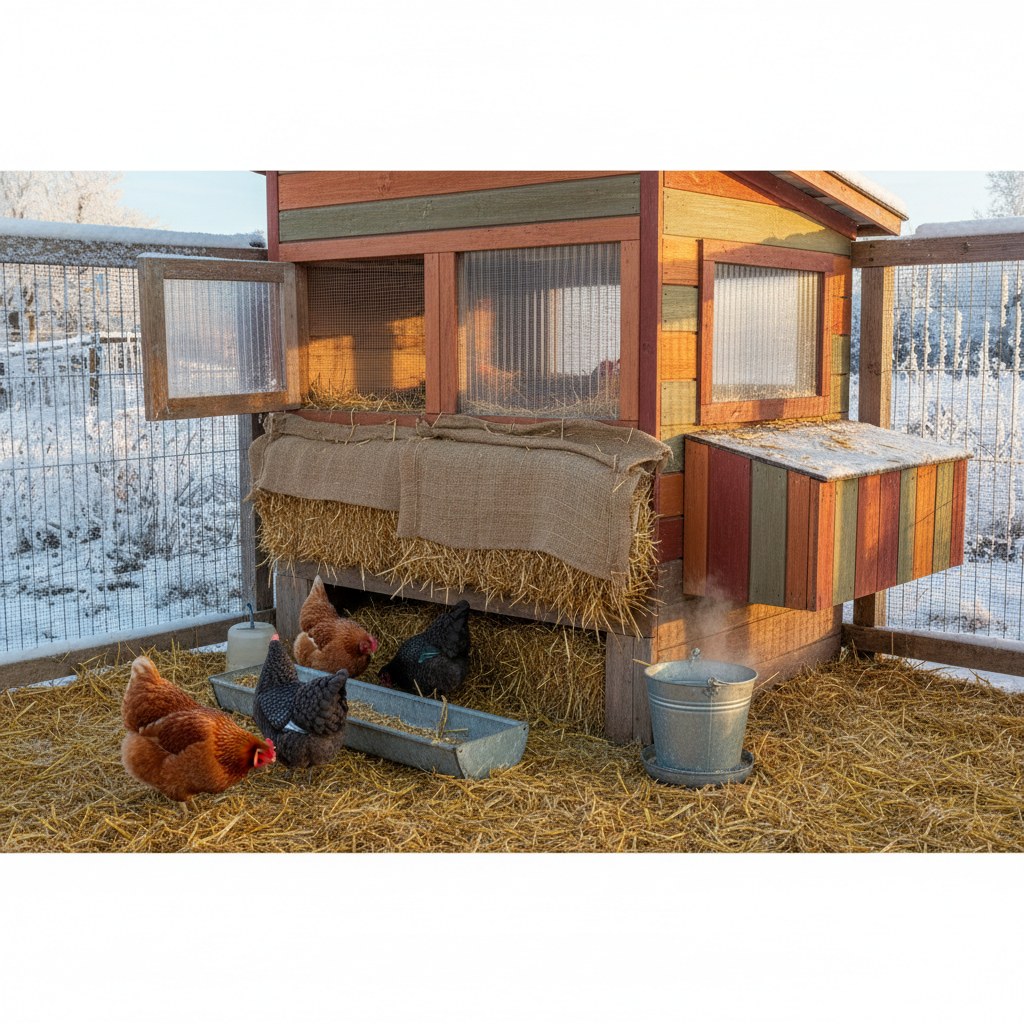
Check Chicken Coop Insulation and Winter Setup
Chickens are hardier than many new keepers expect, most dual-purpose breeds handle cold well as long as they have a few key conditions met: a dry, draft-free space with good ventilation, sufficient calories, and access to liquid water. January is a good time to walk through the coop with fresh eyes and make sure all three are covered.
Ventilation is the most common thing homesteaders get wrong in winter. The instinct is to seal up the coop completely to keep warmth in, but this traps moisture from respiration and manure, leading to frostbite from humidity and respiratory illness. Ventilation should be near the roofline, above where birds sleep, so cold air doesn’t blow directly on them. Gaps or vents near the top of the wall are ideal. Check that yours are open and unobstructed.
Check the roost bars: they should be wide and flat (2×4 lumber laid flat is standard) so birds can sit over their feet and keep them warm. Inspect for mites while you’re at it, look for tiny red or gray dots in the crevices of roost bars and nesting boxes. A January mite check beats discovering an infestation in spring when populations explode.
If your waterer is freezing overnight, a simple submersible water heater or a heated base designed for poultry waterers solves the problem for roughly $25–40. Chickens that can’t access liquid water quickly show drops in egg production and health. Also consider increasing feed slightly in the coldest weeks, birds burn more calories staying warm, and a little extra scratch grain before roost time gives them something to metabolize through the night.
Source: Penn State Extension. Winter Care of Chickens
Plan Spring Projects and Set Your Budget
January is the one month of the year when you have both the time to think and the distance from the busy season to be honest about what’s realistic. Use it to make your spring project list and attach rough costs to each item, before the seed catalogs, hardware store temptations, and animal sales at the feed store start pulling you in twelve directions.

Start by listing every project you wish you’d completed last year. These carryovers represent your highest priorities because you already know they matter. Then add new projects you’re considering, a new raised bed, a brooder upgrade, a small fruit tree guild, a rain barrel system. For each project, write down: what materials you’ll need, roughly what it costs, and when in the season it needs to happen (some projects must be done before planting; others can wait for summer).
Total up your project costs and compare to your homestead budget for the year. Cut ruthlessly: underfunding three projects all at once is usually worse than fully completing one. Build in a 20% buffer for surprises; every year brings unexpected costs. If you don’t have a homestead budget yet, this January is a good time to start one: track what you spend on seeds, feed, supplies, and infrastructure, and compare it to what you harvest or sell. The data will tell you a lot about where your homestead dollar goes furthest.
A written project list posted somewhere visible keeps you accountable in April when you’re tempted to start six new things instead of finishing the ones you planned.
Source: Iowa State University Extension. Farm Financial Planning
Read and Learn: Recommended Books for January
One of the underrated gifts of a cold homestead January is reading time. No weeding, no harvesting, no fence repair emergencies, just evenings by the woodstove with a good book and a cup of something warm. Use this window to build knowledge that will pay off all year. The best homesteaders are lifelong learners, and January is your continuing education semester.

Here are ten books worth your time this winter:
- The Market Gardener by Jean-Martin Fortier. Dense with practical growing techniques from among the most productive small-farm operations in North America. Even if you’re not selling, the efficiency principles apply to any scale.
- Gaia’s Garden by Toby Hemenway. The standard introduction to permaculture for home-scale applications. Excellent for planning companion planting, guilds, and food forests.
- The Organic Farmer’s Business Handbook by Richard Wiswall. If you’re thinking about selling surplus, this is essential reading on making a homestead financially sustainable.
- Keeping a Family Cow by Joann Grohman. The best single-volume resource on small-scale dairy if a house cow is in your future.
- The Encyclopedia of Country Living by Carla Emery. The original homesteading bible. Sprawling and idiosyncratic, but with a density of practical knowledge that hasn’t been matched.
- Fermentation on Wheels by Tara Whitsitt. A lively introduction to fermentation that pairs perfectly with a winter pantry audit.
- The Art of Natural Cheesemaking by David Asher. For anyone interested in taking their dairy further than yogurt and butter.
- Folks, This Ain’t Normal by Joel Salatin. More manifesto than manual, but Salatin’s arguments for decentralized food production are motivating reading when you’re planning a new growing year.
- Breed Your Own Vegetable Varieties by Carol Deppe. For the seed-saving enthusiast or anyone who wants to deeply understand plant genetics without a graduate degree.
- The Winter Harvest Handbook by Eliot Coleman. Essential if you’re considering extending your season with cold frames or low tunnels. Coleman grows year-round in Maine; his techniques translate to almost any climate.
Read one or two deeply rather than skimming ten. Take notes. Flag pages. January reading done well becomes March action.
Source: Goodreads Homesteading Shelf, community-curated reading recommendations
Looking Ahead to February
January planning sets up everything that follows. As the month closes, your seed orders should be placed or nearly there, your tool kit should be clean and sharp, and you should have a written project list for the year. February brings the earliest real seed-starting windows, the first maple sap runs in northern climates, and, if winter holds, more time to finish the planning work you started this month. Take a look at our February Homestead Guide to see what’s coming next.
Frequently Asked Questions
When should I start seeds indoors in January?
Onions and leeks are the primary January starts for most gardeners, they need 10–14 weeks indoors before transplanting and are perfectly happy in cool indoor conditions. Count back from your average last frost date to determine your exact start date. Most other vegetables don’t need to be started until February or March.
Can I prune fruit trees in January if it’s cold?
Yes, dormant pruning is best done in late January through early February in most temperate zones, the tree is fully dormant, disease pressure is low, and cuts heal well. Avoid pruning on days below 28°F or when wood is frozen through, as frozen wood can crack rather than cut cleanly. Also avoid pruning stone fruits (cherries, plums, peaches) until early spring to reduce disease entry through wounds.
How do I know if my canned goods are still safe?
Check for: broken seals (lid flexes when pressed), rust on lids, spurting liquid when opened, off smells, or visible mold. Home-canned goods with intact seals stored in cool dark conditions are generally safe for 1–2 years, though quality degrades. When in doubt, throw it out, the risk isn’t worth it.
What’s the most important January homestead task?
Seed ordering. Varieties sell out early, and your seed choices shape everything from harvest volume to flavor to storage potential. Spend an evening in January with catalogs and last year’s garden notes. Even 30 minutes of focused planning now prevents scrambling in March.
How much light do indoor seedlings need in January?
More than a window can provide in most climates. Aim for 14–16 hours of direct artificial light daily, with lights positioned 3–4 inches above the seedling canopy. Full-spectrum LED or fluorescent shop lights work well and cost $30–60. Without adequate light, seedlings become leggy and weak, which stunts them for the entire growing season.