How to Build a Hugelkultur Raised Bed: The Self-Watering Garden
How to Build a Hugelkultur Raised Bed: The Self-Watering Garden
Imagine a raised garden bed that waters itself, feeds itself, and gets more productive with each passing year. Sound too good to be true? Welcome to hugelkultur — one of the oldest and most effective gardening techniques on the planet, and one that every homesteader should know about.
Hugelkultur (pronounced “hoo-gul-culture”) is a German word meaning “hill culture” or “mound culture.” The technique involves burying logs and woody debris under a mound of soil, creating a raised bed that acts like a giant sponge. As the wood slowly decomposes over years, it absorbs and holds tremendous amounts of water, releases nutrients, generates warmth, and builds incredibly rich, living soil. It’s the ultimate low-maintenance garden bed, and building one is a satisfying weekend project that will reward you for decades.
- Hugelkultur beds use buried decomposing wood to create self-watering, self-fertilizing garden mounds
- A properly built hugelkultur bed can reduce watering needs by 80% or more after the first year
- Best wood choices include hardwoods like oak, maple, apple, and birch — avoid black walnut and cedar
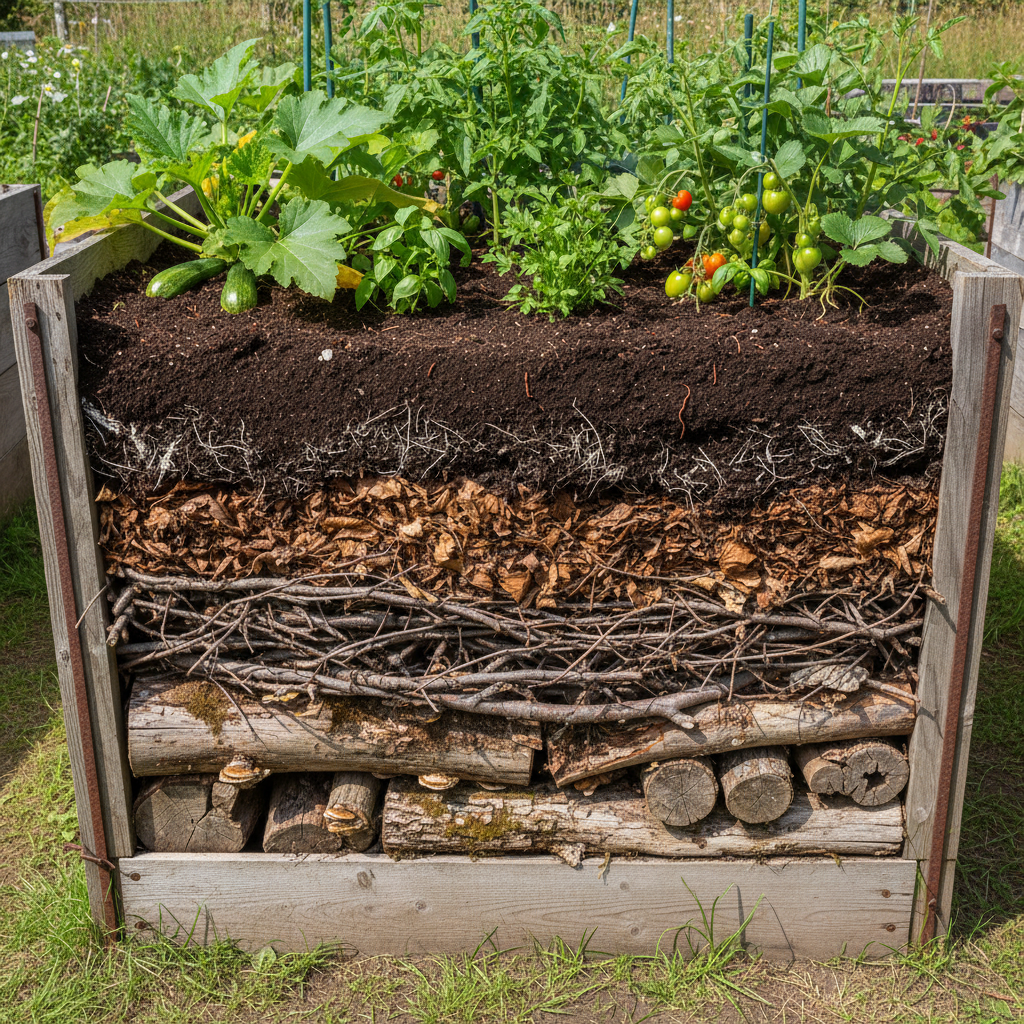
- Layer logs, branches, nitrogen-rich materials, compost, and topsoil for optimal decomposition
- Beds improve year after year as the wood breaks down, with a productive lifespan of 20+ years
How Hugelkultur Works
The science behind hugelkultur is elegant in its simplicity. Wood is essentially a massive carbon sponge. A single cubic foot of rotting wood can hold up to 6 gallons of water. When you bury logs and branches underground, they absorb rainfall and irrigation water like a reservoir. Then, during dry spells, they slowly release that moisture back into the surrounding soil where plant roots can access it.
But the water-holding capacity is just the beginning. As wood decomposes, it’s broken down by billions of fungi, bacteria, and other soil organisms. This decomposition process releases a steady stream of nutrients — nitrogen, phosphorus, potassium, and dozens of micronutrients — directly into the root zone. The fungal networks that colonize the wood (mycorrhizae) also form partnerships with plant roots, dramatically improving nutrient uptake.
The decomposition process also generates heat, which extends your growing season on both ends. A fresh hugelkultur bed can be several degrees warmer than the surrounding soil, letting you plant earlier in spring and harvest later into fall. This is similar to how a well-managed compost pile generates heat as materials break down.
Hugelkultur vs. Traditional Raised Beds
If you’ve already built traditional raised beds, you might wonder what hugelkultur offers that a standard bed doesn’t. The differences are significant.
| Feature | Traditional Raised Bed | Hugelkultur Bed |
|---|---|---|
| Watering needs | Regular, often daily in summer | Minimal after first year, often none |
| Fertility over time | Declines without added amendments | Increases as wood decomposes |
| Initial cost | $$$ for lumber, soil, amendments | Low — uses free wood and debris |
| Lifespan | 5-10 years before wood rots | 20+ years of increasing productivity |
| Soil biology | Good with amendments | Exceptional — thriving fungal ecosystem |
| Labor to build | Moderate | Heavy initial labor |
The biggest advantage is water retention. In my climate, traditional raised beds need daily watering in July and August. My hugelkultur beds that are 3+ years old go weeks without irrigation and the plants never show stress. That alone makes hugelkultur worth the extra effort of construction.
Choosing the Right Wood
Not all wood is created equal for hugelkultur. Your choice of wood affects how quickly the bed becomes productive, how long it lasts, and whether certain plants will thrive or struggle.
Best Wood Choices
Hardwoods are generally the best choice because they decompose slowly and hold water well. Oak, maple, birch, apple, and poplar are all excellent. Fruit tree prunings are fantastic — if you or a neighbor have fruit trees that get pruned annually, that wood is hugel gold. Old logs that are already partially rotted are actually ideal, as they’ll begin functioning as water reservoirs immediately.
Wood to Avoid
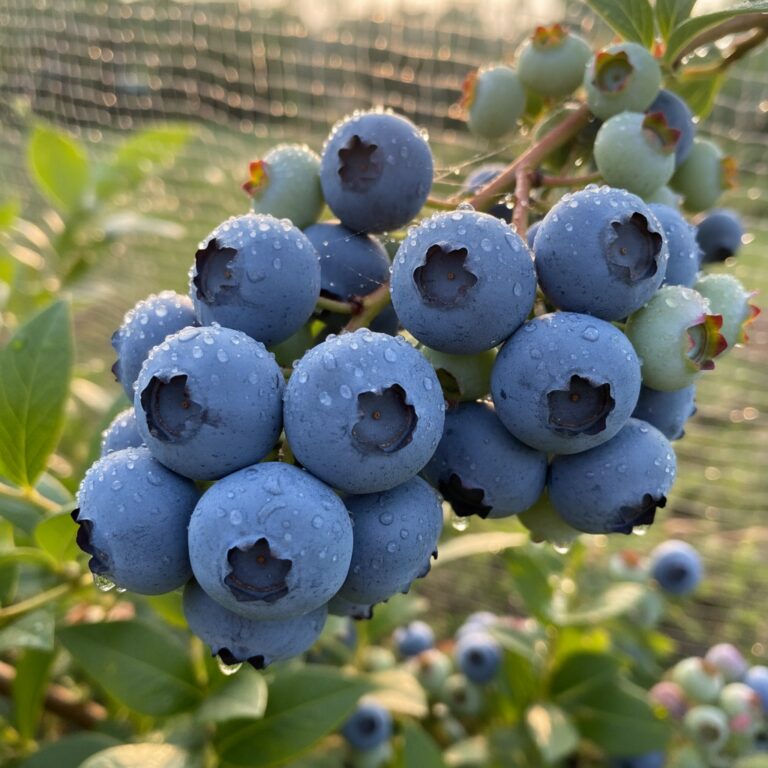
Black walnut is the one absolute no-go. It produces juglone, a chemical that’s toxic to many garden plants including tomatoes, peppers, and eggplant. Cedar and redwood decompose extremely slowly due to their natural preservatives, and they can inhibit some plant growth in the early years. Pine and other conifers are usable but decompose slowly and can make soil acidic initially — they’re fine if you’re planting acid-loving crops like blueberries.
Never use pressure-treated lumber, painted wood, or any wood that’s been chemically treated. These can leach harmful substances into your soil and ultimately into your food.
When our neighbor took down a massive old apple tree, I jumped at the chance to haul away the logs. That was five years ago, and the hugelkultur bed I built with that apple wood is now the most productive bed on our entire property. The tomatoes that come out of it are unreal — deep flavor, huge fruit, and I barely water them all summer. Good wood is the foundation of a great hugel bed, so keep your eyes open for opportunities.
Step-by-Step: Building Your Hugelkultur Bed
Building a hugelkultur bed is straightforward, though it is genuinely hard physical work. Set aside a full weekend and enlist a helper if you can. Here’s the process.
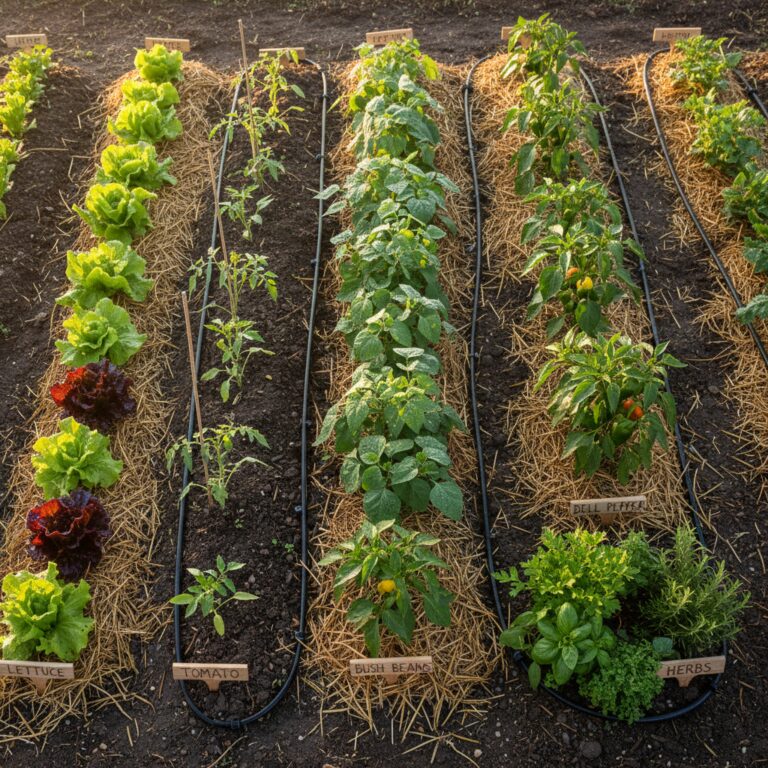
Step 1: Choose Your Location and Size
Pick a spot that gets at least 6-8 hours of sun for vegetable growing. Orient the bed north to south for even sun exposure on both sides. A good starter size is about 3 feet wide, 6-8 feet long, and 3 feet tall (it will settle to about 2 feet over the first year). You can go bigger, but start manageable for your first one.
Step 2: Dig the Trench
Dig a trench about 1-2 feet deep in the footprint of your bed. Set the excavated soil aside — you’ll use it later. This trench isn’t strictly necessary, but it gives you more depth for wood, improves drainage, and anchors the mound. If your soil is heavy clay, dig the trench a bit deeper to help with drainage.
Step 3: Lay the Logs
Place your largest logs in the bottom of the trench. Pack them in tightly, filling gaps with smaller pieces. This base layer should be 12-18 inches thick. Bigger logs are better at the bottom because they hold more water and decompose more slowly, giving the bed longevity. Soak the logs thoroughly with water before covering — this kickstarts the absorption process.
Step 4: Add Branches and Twigs
Layer smaller branches, twigs, and wood chips on top of the logs. This layer should be 4-6 inches thick. The varied sizes create air pockets that eventually become channels for roots and water movement. This is also a good place to add any woody garden debris you’ve been accumulating.
Step 5: Add Nitrogen-Rich Materials
This layer is critical. Fresh wood is very carbon-heavy, and decomposing microorganisms need nitrogen to break it down. Without a nitrogen layer, the bed will actually steal nitrogen from your plants in the first year — a phenomenon called nitrogen draw-down. Add a generous layer of grass clippings, fresh manure (chicken, horse, or cow), kitchen scraps, coffee grounds, or green garden waste. Aim for 3-4 inches thick.
Step 6: Add Compost
Spread 2-3 inches of finished compost over the nitrogen layer. This introduces a massive population of beneficial microorganisms that will colonize the wood below and accelerate decomposition. If you maintain a home compost system, this is a great use for your finished product.
Step 7: Top With Soil
Cover everything with the soil you excavated from the trench, plus any additional topsoil needed. You want at least 6 inches of soil on top — more is better for the first year when roots shouldn’t reach the raw wood layers yet. Shape the mound with sloped sides and a slightly flattened top to prevent erosion.
Step 8: Mulch and Plant
Cover the entire mound with 2-3 inches of mulch — straw, wood chips, or leaves. This prevents erosion, retains moisture in the top layer, and feeds the soil as it breaks down. You can plant immediately if it’s the right season. This approach aligns perfectly with no-till gardening principles, as you’ll never need to turn this soil.
What to Plant in Your Hugelkultur Bed
Year One
In the first year, the wood is still fresh and nitrogen draw-down can be an issue in the deeper layers. Stick to plants that are heavy feeders and relatively shallow-rooted: squash, zucchini, cucumbers, pumpkins, and potatoes all do phenomenally on first-year hugel beds. Legumes like beans and peas are also excellent because they fix their own nitrogen. Avoid nitrogen-sensitive crops like carrots and lettuce in the first year.
Year Two and Beyond
By the second year, the decomposition process is well underway, and you can plant virtually anything. Tomatoes, peppers, and brassicas all thrive. By year three, the bed is hitting its stride — the wood is spongy and fully colonized by beneficial fungi, water retention is at its peak, and nutrients are flowing. This is when hugel beds really shine, and planting cover crops in the off-season becomes less necessary because the bed is generating its own fertility.
Hugelkultur in Different Climates
Hugelkultur works everywhere, but it truly excels in certain conditions.
In dry climates, hugelkultur is practically a miracle. The water-retention capacity means you can garden with a fraction of the irrigation that conventional beds require. Desert homesteaders have reported going weeks without watering established hugel beds during their driest months.
In wet climates, hugelkultur helps manage excess water. The wood absorbs surplus rainfall that would otherwise waterlog roots, then releases it during dry spells. Build your beds taller in wet climates to keep root zones well above the water table.
In cold climates, the thermal mass of decomposing wood keeps soil warmer, extending the season. You can push your planting dates earlier and your harvest dates later — sometimes by several weeks.
We get about 30 inches of rain a year here, which sounds like plenty until you realize most of it comes in spring and fall. By July, we’re usually bone dry for weeks at a stretch. My hugel beds are the only part of the garden that sails through those dry spells without daily watering. Last August, I didn’t water my 4-year-old hugel bed for three weeks during a dry spell, and the squash plants never even wilted. Meanwhile, my traditional raised beds needed water every single day.
Common Mistakes to Avoid
Hugelkultur is forgiving, but there are a few pitfalls that can slow you down.
Not adding enough nitrogen. This is the most common mistake. Skimping on the nitrogen layer means the bed will rob nitrogen from your plants for the first year or two. Be generous with manure, grass clippings, or other high-nitrogen materials.
Not enough soil on top. Too thin a soil layer means plant roots hit raw wood too quickly. Aim for at least 6 inches, preferably more, for the first year.
Using the wrong wood. Black walnut will poison your plants. Cedar will resist decomposition for years. Stick to the recommended hardwoods.
Building too wide. If you can’t reach the center of the bed from either side, you’ll compact the mound by walking on it. Keep beds no wider than 4 feet, or build a path along the top ridge.
Expecting perfection in year one. A hugel bed in its first season is good but not magical. The real benefits emerge in years two through five as the wood decomposes and the biological systems mature. Be patient.
Integrating Hugelkultur Into Your Homestead
Hugelkultur beds fit naturally into a permaculture design approach. They turn waste wood into a productive resource, build soil without external inputs, and create self-sustaining growing systems. Consider building hugelkultur beds in areas where you’re clearing trees or brush — the material is right there. Use them along the edges of food forests, as the backbone of a kitchen garden, or as a way to rehabilitate poor, compacted soil.
They also pair beautifully with other soil-building techniques. Planting cover crops on hugel beds in the off-season adds even more organic matter. Top-dressing with compost each spring accelerates the decomposition process. And the rich fungal ecology of a mature hugel bed is the perfect foundation for growing nutrient-dense food.
The Long Game: What to Expect Over the Years
A hugelkultur bed is a long-term investment that pays increasing dividends over time. Here’s what the trajectory looks like.
In year one, the bed settles 30-40% as materials compress. Watering needs are reduced but not eliminated. Stick to heavy feeders and nitrogen fixers. In years two through three, noticeable improvement in water retention and plant vigor occurs. Soil darkens as organic matter increases. Most crops grow well. By years four through seven, the bed is in peak performance. Water retention is exceptional. Soil is dark, crumbly, and full of life. Yields are significantly higher than conventional beds. From years eight through twenty, the largest logs are still slowly decomposing, continuing to feed the system. Soil quality is extraordinary. The bed gradually flattens but maintains its productivity.
Eventually, after 15-20 years, most of the wood will have fully decomposed, leaving behind incredibly rich, deep soil. At that point, you can either continue growing in the amazing soil you’ve created or build a new hugel bed on top of it for another generation of self-watering productivity.
Frequently Asked Questions
Can I build a hugelkultur bed in a traditional raised bed frame?
Absolutely. A framed hugelkultur bed gives you the tidy appearance of a traditional raised bed with the water-retention and soil-building benefits of hugelkultur. Simply layer logs, branches, nitrogen materials, compost, and soil inside your existing frame instead of filling it entirely with soil mix. You’ll use far less purchased soil and get a much more productive bed. The frame just needs to be deep enough — at least 18 inches — to accommodate the layers.
How often do I need to add soil as the bed settles?
Plan to add 2-3 inches of compost or soil to the top of your bed each spring for the first 3-4 years as the wood decomposes and the bed settles. After that, settling slows dramatically and annual top-dressing becomes optional, though always beneficial. Many gardeners simply mulch heavily each fall and let the mulch break down into the bed over winter.
Will the buried wood attract termites?
This is a common concern, but in practice hugelkultur beds don’t cause termite problems. The wood is buried and stays consistently moist, which actually isn’t the ideal environment for most termite species. Just don’t build your hugel bed right against your house foundation or any wooden structures. A buffer of at least 3-4 feet is good practice. In the decades that people have been building hugel beds, termite issues are extremely rare.
Can I use fresh green wood or does it need to be seasoned?
Both work. Fresh green wood actually has some advantages — it’s already full of moisture and will begin decomposing faster than dried wood. Seasoned or partially rotted wood is also excellent because it’s already partway through the decomposition process. The one thing to avoid is heavily dried, seasoned hardwood that has become very dense — it takes much longer to rehydrate and begin breaking down. A mix of fresh and partially rotted wood is ideal.
Is hugelkultur suitable for small gardens?
Yes. While the dramatic 6-foot tall mounds you see in permaculture demonstrations are impressive, you can build a functional hugelkultur bed at any scale. Even a 3×3 foot bed with logs buried 12 inches deep will provide meaningful water retention and soil-building benefits. Small-scale hugel beds are perfect for urban homesteaders or anyone with limited space who wants the benefits without the massive earthmoving project.