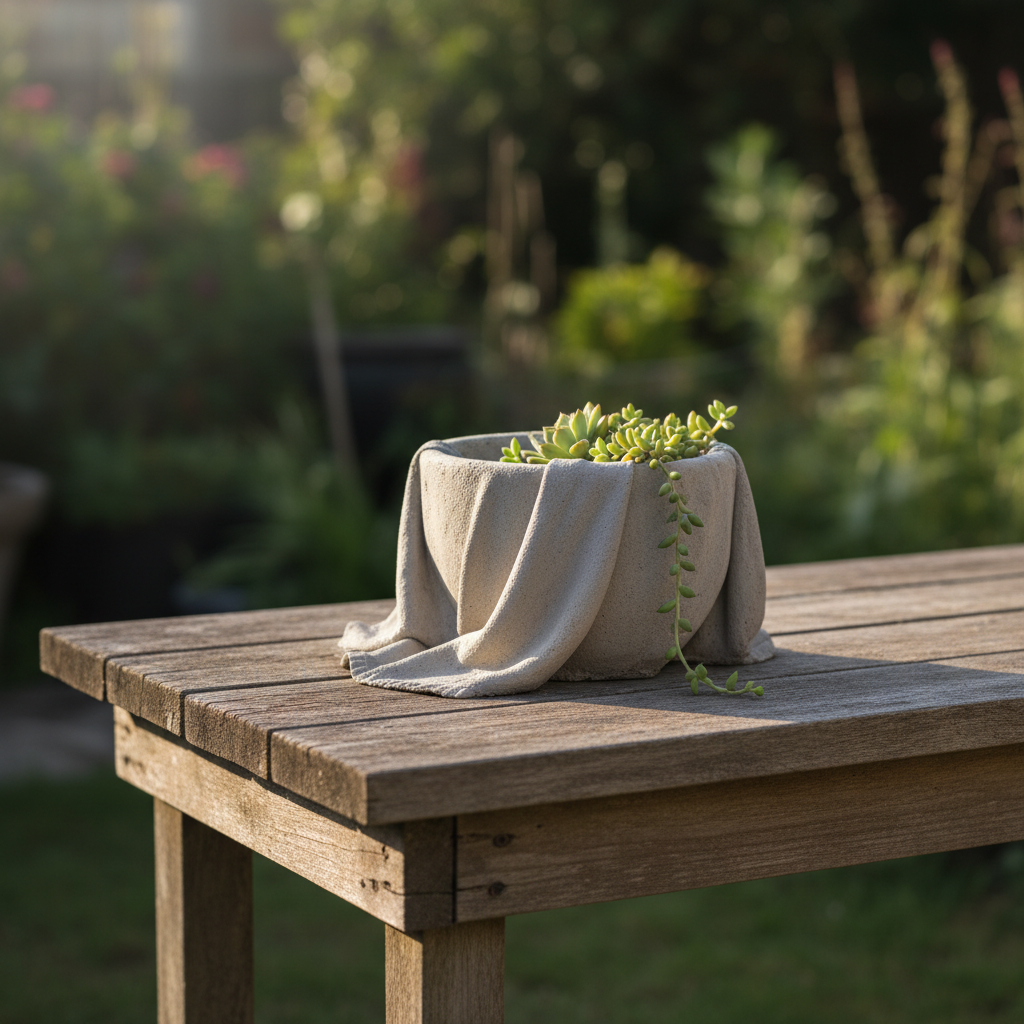
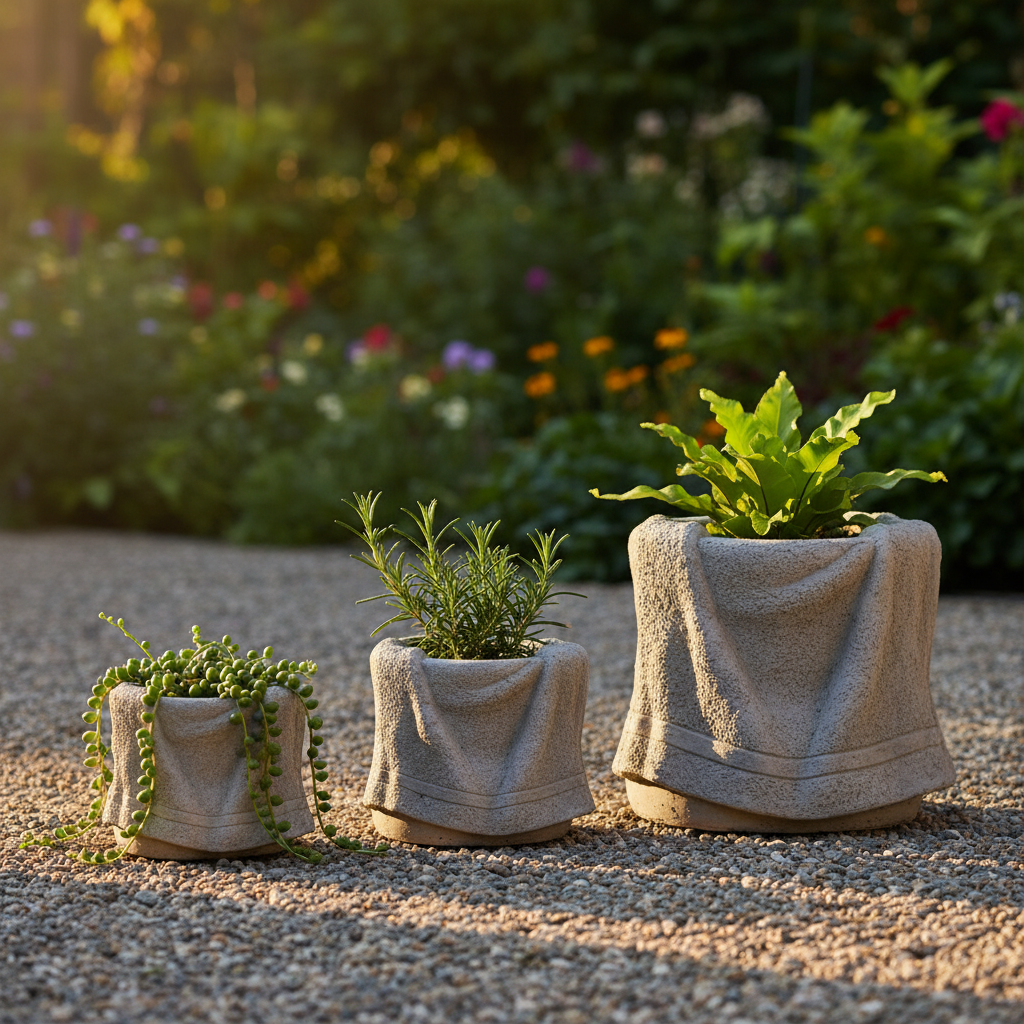
DIY Cement Towel Planter: Weekend Guide to Draped Concrete Pots
TL;DR: A draped cement towel planter is a thick cotton towel or burlap sack dipped in concrete slurry and draped over a mold to cure. Total materials run about $10–15, most strength develops within 7 days (28 days for full strength per the Portland Cement Association), and an 8–10 inch planter weighs roughly 6–9 lb finished. Wear nitrile gloves and a dust mask, fresh cement is caustic at pH 12–13 (OSHA).
Key Takeaways
- Best fabrics to drape: cotton terry towel, burlap, or loose-weave cotton. Tight synthetics won’t absorb slurry.
- Mix: sifted Portland cement + water to pancake-batter consistency. Skip coarse-aggregate mixes, sand and gravel won’t penetrate fabric.
- Timeline: drape and cure 24 hours before demolding, 7 days before loading with soil, ideally 28 days before outdoor freeze-thaw exposure.
- Plant safety: soak the finished pot in water for 3–5 days to leach alkalinity before planting, fresh concrete can raise water pH above 11 (Pracht et al., 2010).
- PPE required: nitrile gloves + N95 or better. Fresh cement burns skin; dust damages lungs.
A cement towel planter is one of the highest-return backyard DIY projects: about $10 in materials, one afternoon of work, and the result looks like it came from a $150 boutique. This guide covers the part that the TikTok tutorials skip, cure times, fabric choices, freeze-thaw durability, and the safety steps that matter when you’re working with caustic material. If you want container options without the cement step, our 25 garden pot ideas for small spaces covers store-bought and scrappier alternatives.
What is a cement towel planter?
A cement towel planter is a garden pot made by soaking a thick fabric, usually a cotton towel, burlap sack, or loose-weave cloth, in wet cement slurry and draping it over a mold (a bucket, flowerpot, or plastic tote) so it hardens into a free-standing vessel. The fabric acts as internal reinforcement; once cured, it becomes a textured, one-piece concrete shell. According to the Portland Cement Association, concrete continues gaining strength for weeks, with most compressive strength developed in the first few weeks after placement.
The technique trended on TikTok and Pinterest through 2024–2025 because the finished pieces look sculptural and cost a fraction of store-bought concrete planters. Comparable retail concrete planters in the 10-inch class commonly sit in the $40–80 range; the DIY version runs closer to $4–6 in materials per pot. The trade-off is time: you wait at least 24 hours to demold and up to 28 days before the concrete hits full design strength.
What materials do you need?
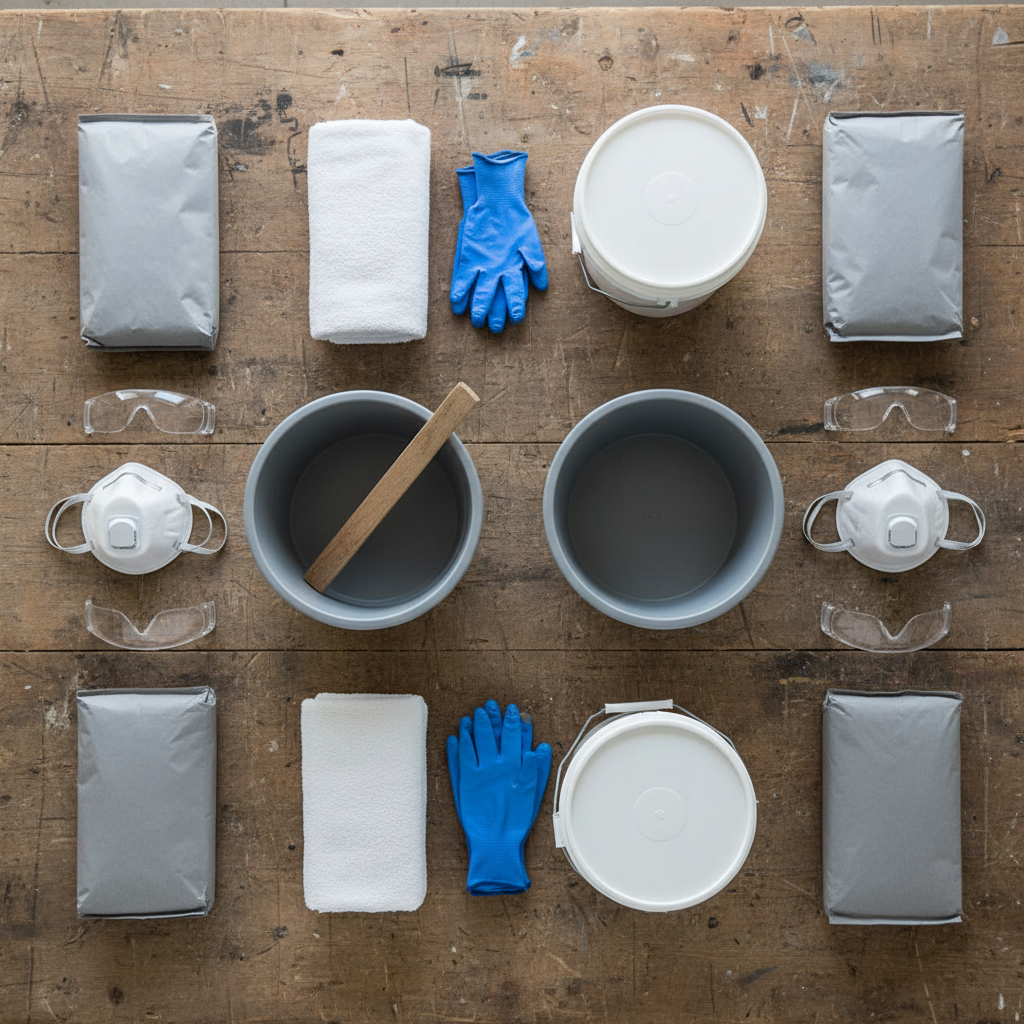
You need five things: cement, fabric, a mold, water, and personal protective equipment. Per the Quikrete product line, standard concrete mix (No. 1101) contains Portland cement, sand, and gravel, which is the wrong product here because the coarse aggregate won’t penetrate fabric. For draping, use plain Portland cement or a sanded mortar mix instead. A 60-lb bag of Quikrete Portland Cement Type I/II typically runs $6–9 at Home Depot or Lowe’s (observed pricing, 2025–2026; verify at purchase).
- Cement: 2–3 cups sifted Portland cement per small-to-medium pot. A single $6–9 bag makes 20+ planters.
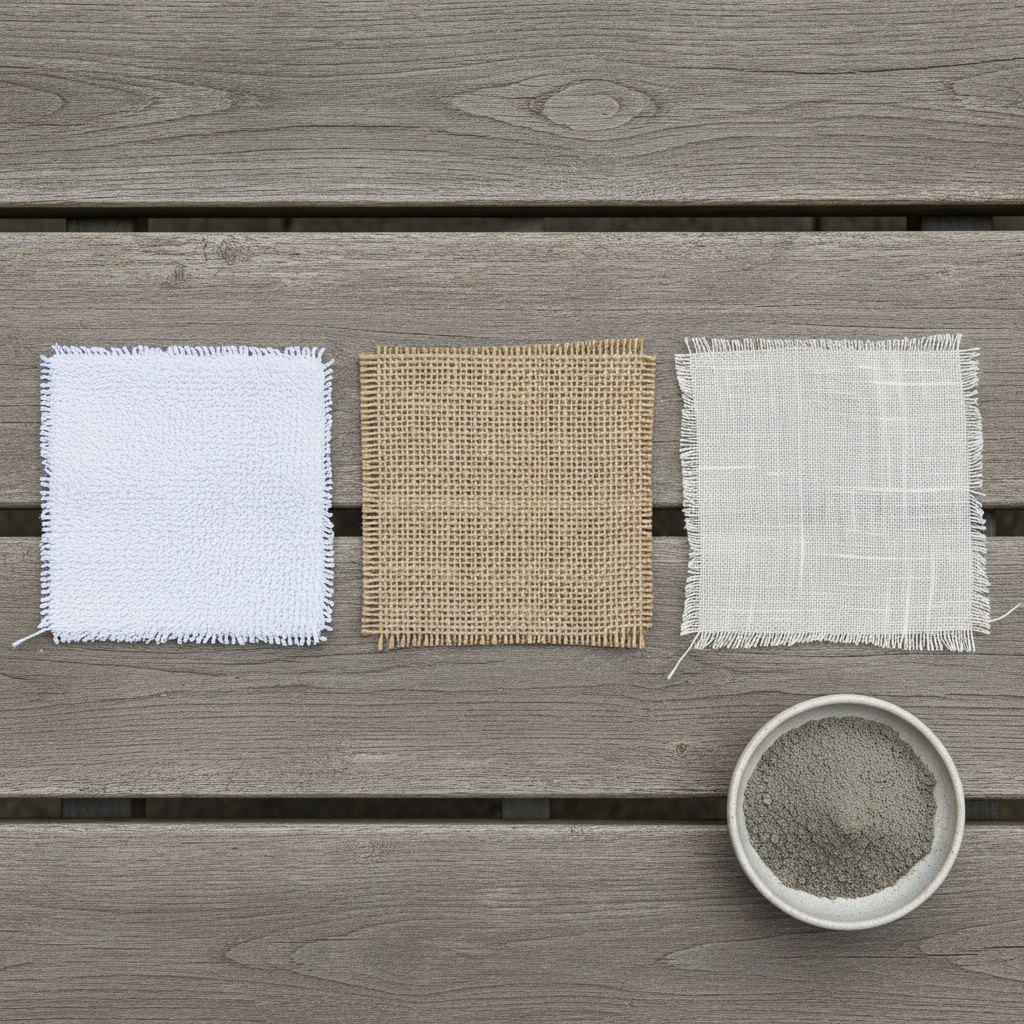
- Fabric: cotton bath towel (terrycloth), burlap sack, or loose-weave cotton cloth. Avoid microfiber, fleece, and tight synthetics, they shed slurry.
- Mold: plastic bucket (5-gallon or smaller), plastic flowerpot, glass jar, or cardboard box. Anything sturdy and dome-shaped works.
- Release layer: plastic trash bag, cling film, or petroleum jelly to cover the mold so the cement doesn’t bond to it.
- Mixing container: disposable plastic tub (2-gallon minimum). Never use a container you plan to use for food again.
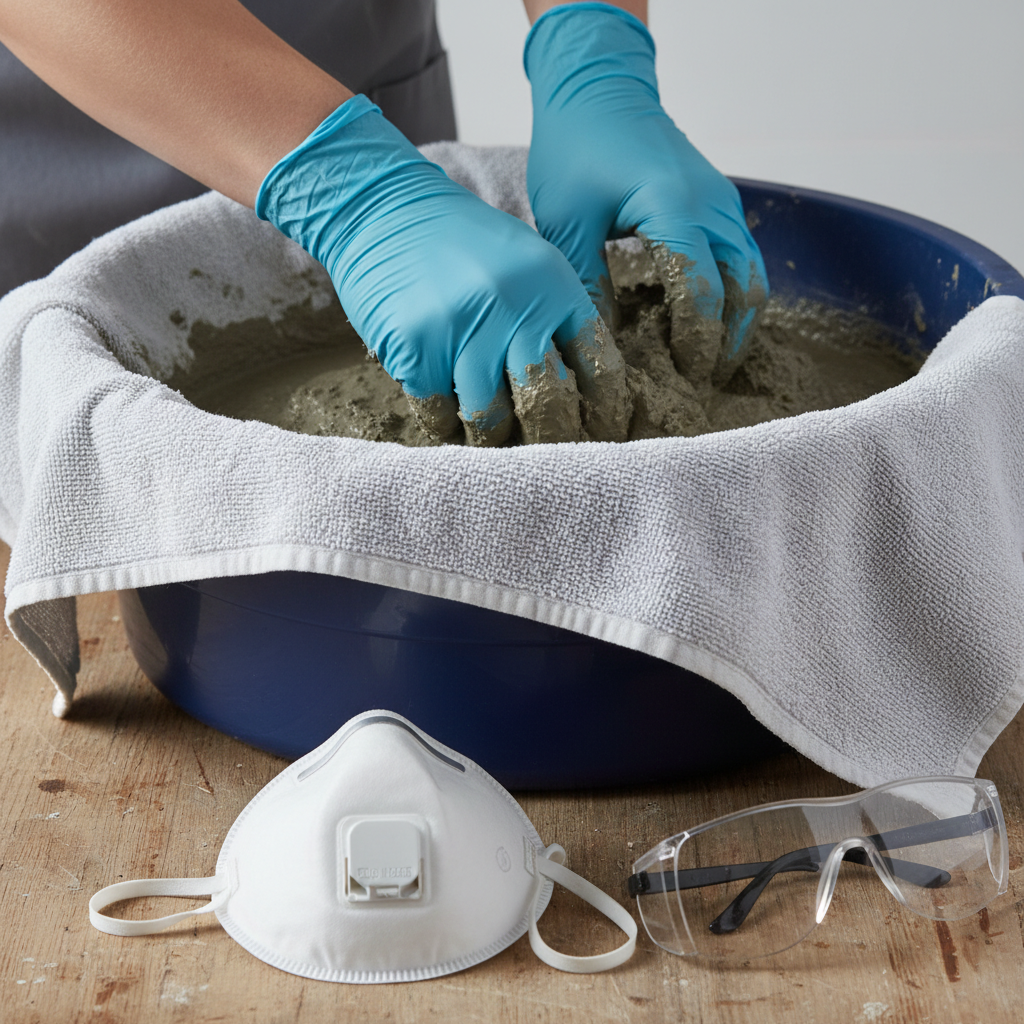
- PPE: nitrile or neoprene gloves (not cotton, cement soaks through), N95 mask, safety glasses, long sleeves.
- Optional: acrylic concrete sealer for interior sealing, drill with masonry bit for drainage hole, sandpaper (100-grit) for finishing.
Which fabric works best for draping?
Natural-fiber fabrics with looser weaves absorb cement slurry best. Cotton terrycloth towels, burlap sacks, and loose muslin all work reliably; the thick nap of a bath towel holds more slurry than a flat sheet and produces a sturdier wall. DIY testing from the concrete-draping community (not a tier-1 source but consistent with what fiber absorbency predicts) finds that tight synthetics like microfiber and fleece shed slurry without saturating, so walls end up too thin to hold up. Burlap surprises people, it absorbs well and cures into a textured, rustic finish.
Fabric size should roughly match the mold you’re draping over. A standard bath towel (about 27 × 52 inches) drapes well over a 5-gallon bucket; a hand towel suits a small flowerpot or a jar. Trim the fabric if it’s dramatically oversized, the extra weight will deform the planter as it cures. Do not wash the towel in fabric softener before use; softener residue can disrupt cement bonding. A cheap thrift-store towel or an old one retired from household use is ideal. For more small-space container strategies after the pot cures, see our container gardening guide.
How do you make a cement towel planter step-by-step?
The full process takes about 45 minutes of active work plus 24 hours of cure time before demolding. Work outdoors or in a well-ventilated garage, cement dust irritates lungs, and the CDC/NIOSH exposure limits are 10 mg/m³ total dust and 5 mg/m³ respirable. Put on your PPE before you open the cement bag.
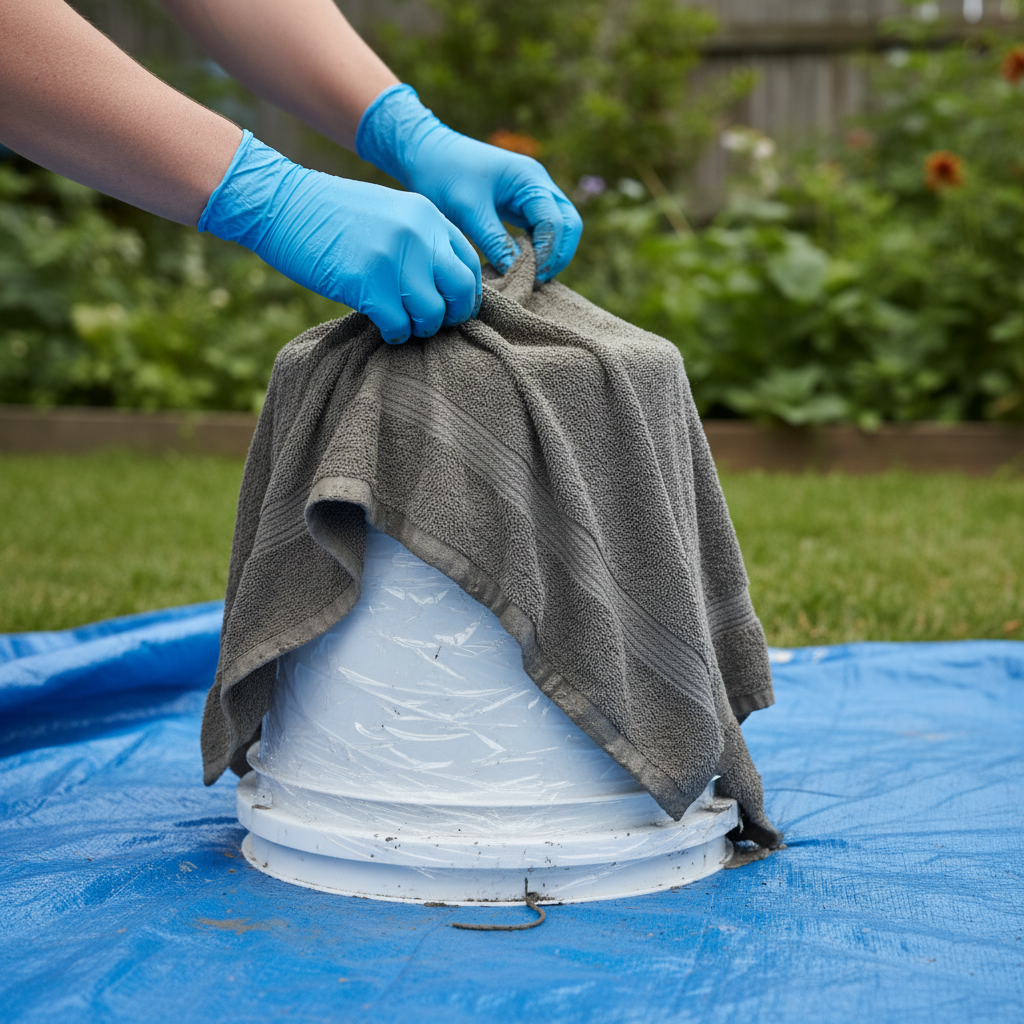
- Prepare the mold. Turn a bucket or flowerpot upside down on a flat work surface. Drape plastic sheeting or cling film over it so the cement won’t stick. Tuck loose plastic under the mold to keep it in place.
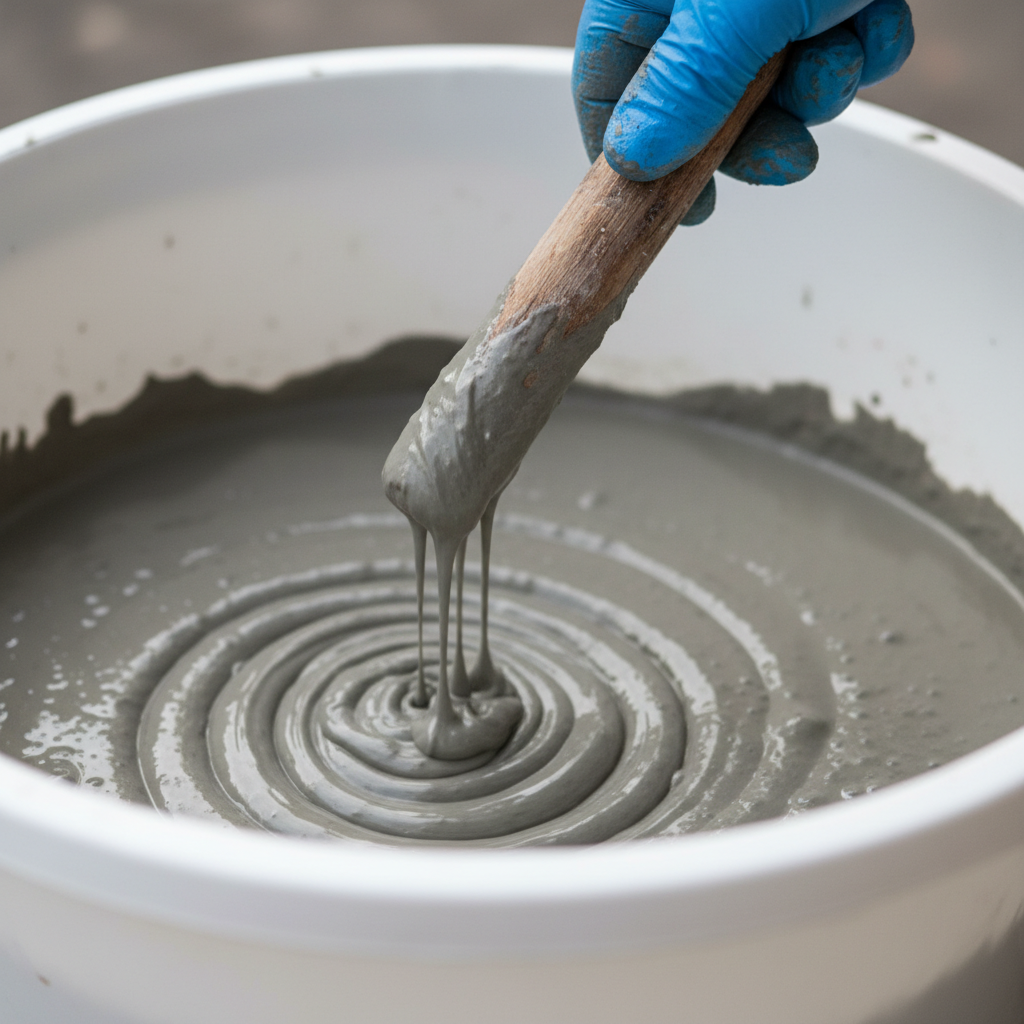
- Mix the slurry. In your plastic tub, combine roughly 3 cups sifted Portland cement with 1 to 1¼ cups water. Stir with a scrap of wood or an old spatula until it reaches pancake-batter consistency, thick enough to coat a spoon but still pourable. Add water a tablespoon at a time; over-watering weakens the final pot.
- Saturate the towel. Lay the towel flat, pour the slurry onto it, and work it through with gloved hands until every fiber is soaked. The towel should drip slightly but not run. This is the messiest step, do it over the mixing tub to catch runoff.
- Drape over the mold. Lift the saturated towel by two opposing corners and drape it center-down over the covered mold. Let the corners hang naturally or fold them for a specific silhouette. Adjust drape lines in the first 2–3 minutes; after that, the slurry starts setting.
- Cure 24 hours undisturbed. Cover loosely with a damp cloth or plastic bag to slow moisture loss, slower cures produce stronger concrete. Keep above 50°F. Do not move or touch it.
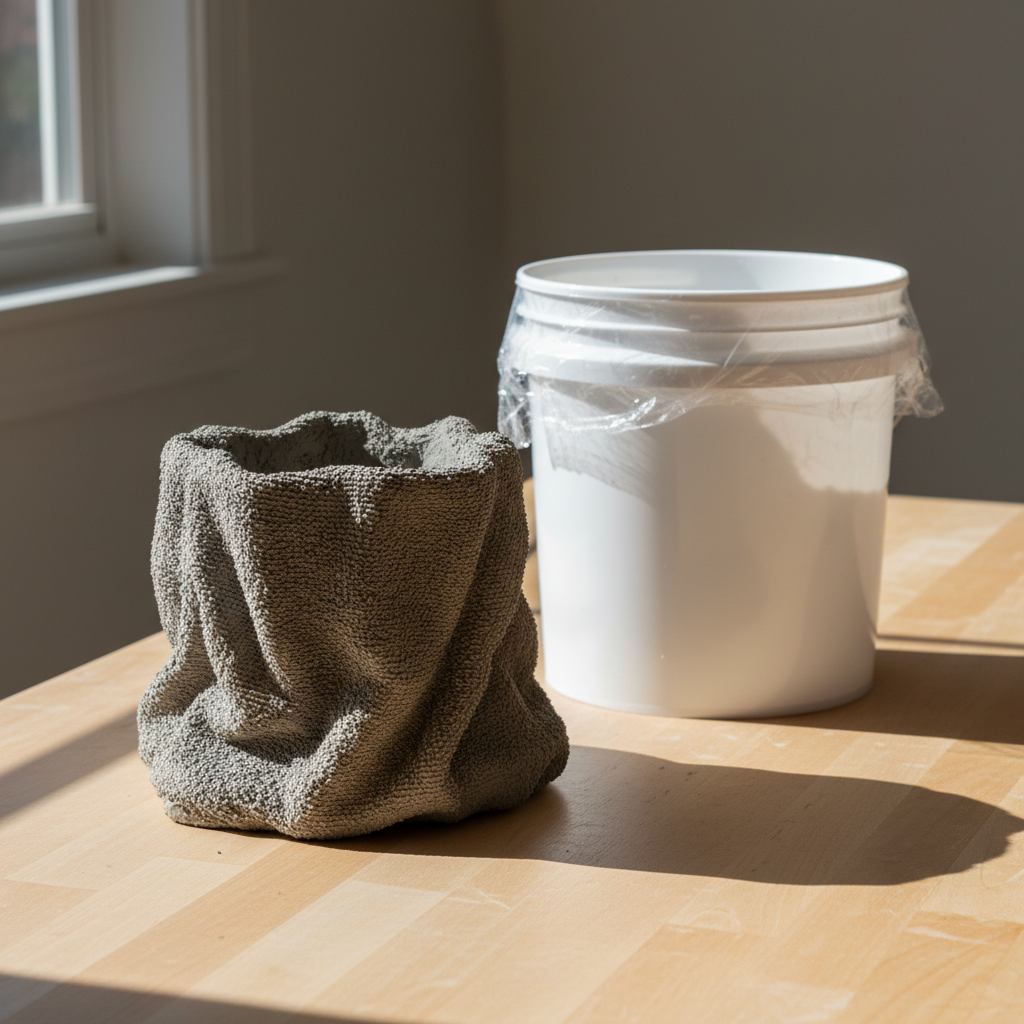
- Demold. After 24 hours the piece is at “handling strength”, strong enough to lift carefully but not yet full strength. Flip it right-side up and peel the inner plastic and mold away. Brush loose fiber and fix small chips with a bit of leftover slurry.
- Drill drainage. With a masonry bit, drill one ½-inch hole in the base. This is not optional; per University of Illinois Extension, drainage holes are critical so soil doesn’t stay waterlogged.
- Cure another 6 days. Keep the pot in shade, ideally under a damp towel, for a total of 7 days from pour. This brings it to usable strength for normal handling and light soil loads.
How long does a cement towel planter take to cure?
Cement gains most of its strength in the first few weeks but reaches the industry benchmark of design strength at 28 days, according to the Portland Cement Association. For a draped towel planter, the practical schedule is tiered: 24 hours to handling strength (safe to demold), 7 days to usable strength (safe to fill with soil and plant), and 28 days to full strength (safe for outdoor freeze-thaw exposure).
| Time from pour | % of final strength | What it supports |
|---|---|---|
| 24 hours | ~20–40% | Careful handling, demolding |
| 7 days | ~60–75% | Filling with soil, light planting indoors |
| 28 days | 100% (design strength) | Outdoor use, freeze-thaw exposure |
Temperature matters. Concrete cures slower below 50°F and can fail to reach full strength below 40°F. If you’re working in cool weather, move the piece indoors or wrap it with insulating blankets. Conversely, direct sun and dry wind pull moisture out of the surface too fast and cause shrinkage cracking, this is why a damp cloth cover during the first week is worth the extra step.
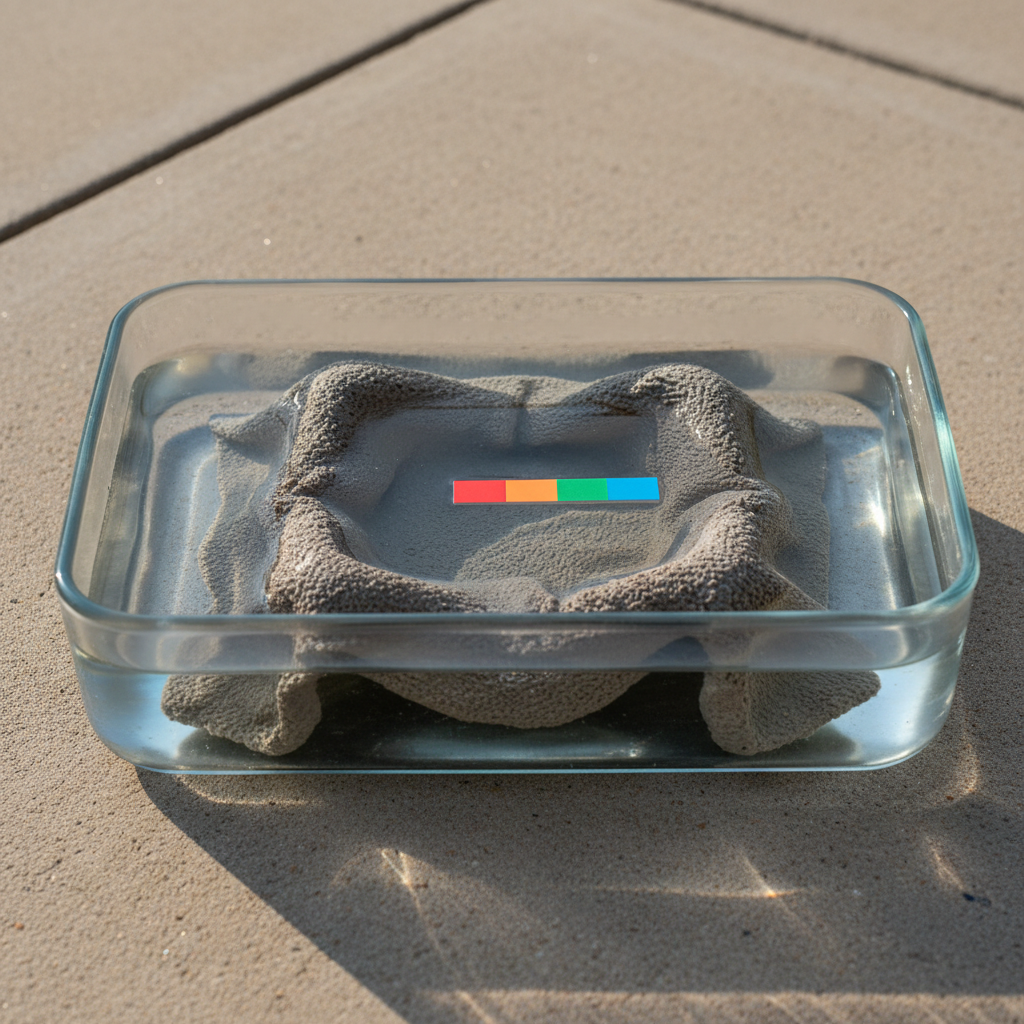
How do you season a concrete planter before planting?
Season the pot by soaking it in water for 3–5 days before planting, changing the water daily. Per peer-reviewed research from Pracht et al. (2010) in Water, Air, & Soil Pollution, fresh concrete leaches hydroxide ions that can raise surrounding water pH above 11, too alkaline for most plants to thrive. Daily water changes flush the hydroxides out and bring the pot’s surface pH closer to neutral before roots contact it.
Quick test: after a few days of soaking, use a pool or garden pH strip on the soak water. If the water is below pH 9, the pot is ready for acid-loving plants (blueberries, azaleas should wait longer); below pH 8 it’s ready for most garden plants. Succulents and Mediterranean herbs like rosemary and thyme tolerate higher pH and can be planted sooner. For a fuller breakdown of plants that handle alkaline soil, our guide on building a garden trellis pairs well since both projects support patio container setups.
What about freeze-thaw durability outdoors?
Plain unreinforced concrete scales and cracks under repeated freeze-thaw cycles, according to peer-reviewed durability research (PMC3618942). When water inside the concrete freezes it expands (a well-established physical property of ice), creating internal pressure that progressively fractures the surface. Two tactics improve outdoor durability: keep the water-cement ratio low (don’t over-water your mix), and let the pot reach full 28-day strength before its first freeze.
For freeze-prone climates (USDA zones 3–6), the cleanest outdoor strategy is to bring cement towel planters indoors, into a garage, basement, or sheltered porch, for winter. The planters are light enough (6–10 lb empty) that seasonal relocation is realistic. If winter storage isn’t an option, seal the interior with an acrylic concrete sealer after the pot is fully cured and dry. Sealing reduces water absorption and measurably slows freeze-thaw damage, though no home sealer fully eliminates it.
What safety precautions matter for a cement towel planter?
Wet cement is caustic. According to OSHA publication 3351, when water is added to Portland cement, calcium hydroxide forms with a pH of 12–13, which can produce alkaline (caustic) skin burns. The hazard is worse than many people expect because cement burns often don’t hurt right away, damage progresses for hours under gloves or clothing before the skin reacts. Flush any skin contact immediately with water for 20 minutes and remove cement-soaked clothing.
- Wear nitrile or neoprene gloves, not cotton. Cement slurry soaks through cotton in minutes.
- Wear an N95 or better mask. CDC/NIOSH sets permissible limits of 10 mg/m³ total dust and 5 mg/m³ respirable; cement irritates eyes, nose, and airways.
- Wear safety glasses and long sleeves. Splashes happen during mixing and draping.
- Never cut cured concrete indoors without water. Per OSHA, cutting concrete dry releases respirable crystalline silica; wet cutting substantially reduces dust.
- Keep cement away from pets and children. Dust and slurry are toxic to ingest.
- Dispose of slurry in a trash bag, never rinse down a drain. Hardened cement clogs pipes.
What are the most common mistakes?
Four mistakes account for most failed planters. First, over-watering the mix, people add water until the slurry pours easily, which weakens the final concrete and causes cracking. Stick to pancake-batter consistency: it should reluctantly drip off a spoon, not stream. Second, using concrete mix with coarse aggregate: the gravel won’t penetrate fabric, and the towel won’t saturate. Use plain Portland cement or sanded mortar mix instead. Third, demolding too early, under 24 hours, the piece is still fragile enough to crack when handled. Fourth, skipping the water soak before planting, which stresses or kills roots from the high surface pH.
Tips for a better-looking finished planter
Small decisions during draping determine whether the piece looks sculptural or lumpy. Fold the fabric into pleats or let it drape naturally in waves, both beat a flat, towel-over-ball look. For a cleaner silhouette, use a taller mold with a narrower base (a large plastic flowerpot or a tall bucket) so the pleats fall gracefully instead of puddling. Multiple pots from the same batch should use the same towel type to keep textures consistent as a set.
Finishing touches: once fully cured, sand the rim lightly with 100-grit sandpaper for a softer edge. Stain the outside with dilute acrylic craft paint (1 part paint : 3 parts water) for a weathered look, then reseal with matte concrete sealer. For the interior, brush on an acrylic concrete sealer before the first planting to reduce moisture wicking and extend the pot’s lifespan. Most hardware-store acrylic concrete sealers are sold in quart cans; check the specific product label for coverage.

Frequently asked questions
How much does a cement towel planter cost to make?
About $4–6 in materials per pot once you’ve bought the cement bag. A single 60-lb bag of Portland cement ($6–9) produces roughly 20 small-to-medium planters. Add a thrift-store towel ($2–4) and a reused bucket from your garage, and your per-unit cost is under $5. Compare that to $40–80 for a comparable 10-inch retail concrete planter. Our broader homesteading on a budget guide has more projects that hit this same price-to-outcome ratio.
How heavy is a finished planter?
A typical 8–10 inch draped towel planter with ½-inch walls weighs roughly 6–9 pounds empty, based on normal concrete density of 150 lb/ft³ (ASTM C138 / ACI 211.1). A 9-inch-tall, 7-inch-diameter planter with ½-inch walls contains about 0.05 cubic feet of concrete, roughly 7.6 pounds. Add soil and plants, and you’re usually in the 15–25 lb range when filled, light enough to lift but heavy enough not to blow over in wind.
Can I use dollar-store cement instead of Portland cement?
Brand-name Portland cement (Quikrete, Sakrete, Cemex) is preferred because the particle size and purity are consistent. Off-brand or expired cement can be lower-purity or partially hydrated from moisture absorption, which produces weak finished pots. Per the Quikrete product line, their Portland cement is Type I/II meeting ASTM C150 specifications. Spend the extra $3 on a name-brand bag, it’s the difference between a pot that lasts five years and one that crumbles in two.
Will the pot damage my plants?
Not after proper seasoning. The risk is fresh concrete’s surface alkalinity, peer-reviewed leaching research shows fresh concrete can raise surrounding water pH above 11 before it stabilizes. Soaking the cured pot in water for 3–5 days with daily water changes leaches most of the surface hydroxides. After that, the pot tolerates most plants. Blueberries, azaleas, and other strongly acid-loving plants should wait longer or use a liner.
Can I leave the planter outside all year?
In USDA zones 7 and warmer, yes, if the pot is fully cured (28 days) and has a drainage hole so water doesn’t pool inside and freeze. In zones 3–6, freeze-thaw cycles progressively damage plain concrete per peer-reviewed durability research, pots scale, crack, and eventually collapse. The practical solution is to bring planters indoors for winter, or seal the interior with acrylic concrete sealer to slow (but not stop) water absorption.
Can I skip the towel and pour cement directly into a mold?
Yes, but you’ll produce a smooth cast pot, not the textured draped look. Direct-cast concrete planters use two nested molds with cement poured between them, this technique requires a rigid inner mold sized about 1-inch smaller on every side than the outer mold. The towel-drape technique is valued specifically because the fabric texture telegraphs through to the finished surface, giving the pot its sculptural, one-of-a-kind character. If you want a smooth cast look, dollar-store plastic flowerpots work well as outer molds.
The bottom line
A cement towel planter is a one-afternoon project that produces a $50-looking pot for $5. The real craft is in the details most tutorials skip: using plain Portland cement instead of coarse-aggregate concrete mix, waiting the full 24 hours before demolding and 28 days before outdoor freeze-thaw exposure, soaking the pot for 3–5 days to leach surface alkalinity before planting, and treating wet cement like the caustic material it is. Get those four right and a single $6–9 bag of cement produces a matched set of planters that rivals anything at a garden center.