How to Test and Amend Your Garden Soil
Key Takeaways
- A professional soil test (typically $15–30 through your county extension office) is the most accurate and valuable investment you can make in your garden.
- DIY tests — the jar test for texture, pH strips, and the squeeze test — give you useful baseline information and are worth doing even if you also send samples to a lab.
- Soil pH controls nutrient availability. Even nutrient-rich soil can starve plants if the pH is too high or too low for nutrients to be absorbed.
- The most common amendments — lime (raises pH), sulfur (lowers pH), compost (improves everything), and gypsum (loosens clay) — solve the vast majority of home garden soil problems.
- Amend in fall when possible, giving materials time to integrate before spring planting. Compost is the one amendment you can almost never overdo.
Good gardening starts below the surface. You can buy the best seeds, follow every watering schedule, and time your plantings perfectly — but if your soil is wrong, everything struggles. The frustrating part is that bad soil doesn’t always look bad. It might look dark and rich while being locked at a pH that prevents nutrient uptake. It might feel crumbly and nice while lacking essential minerals.
Testing removes the guesswork. And the good news is that most soil problems are very fixable once you know what you’re dealing with.
Start With What You Can See and Feel: DIY Soil Tests
Before spending money on a lab test, you can learn a surprising amount about your soil with tests you can do in your kitchen or backyard. These won’t give you precise numbers, but they’ll tell you enough to start making smart decisions.
The Squeeze Test (Soil Texture)
Grab a handful of moist (not wet) soil from your garden. Squeeze it firmly in your fist, then open your hand.
- If it holds its shape and feels gritty, then crumbles when you poke it: Sandy loam. Good drainage, warms up quickly, but dries out fast and doesn’t hold nutrients well.
- If it holds its shape in a tight ball and feels slick or sticky: Clay. Holds moisture and nutrients well but drains poorly, compacts easily, and is slow to warm in spring.
- If it holds its shape loosely and crumbles easily with a poke, with a slightly spongy feel: Loam. Congratulations — you’ve won the soil lottery. Good drainage, good moisture retention, good nutrient holding capacity.
Most of us have some mix of these. Knowing where you fall on the sandy-to-clay spectrum guides your amendment choices.
The Jar Test (Detailed Texture Analysis)
This is one of the most useful DIY soil tests out there, and it costs nothing.
- Fill a quart mason jar about one-third full with garden soil. Remove any large rocks, roots, or debris.
- Fill the jar almost to the top with water, leaving an inch of airspace.
- Add a tablespoon of liquid dish soap (this helps the particles separate).
- Screw on the lid tightly and shake vigorously for 2–3 minutes.
- Set the jar on a flat surface and don’t move it.
- After 1 minute, mark the level of settled material on the jar with a marker. This is your sand layer.
- After 4 hours, mark the new level. The material between the first mark and this one is silt.
- After 24–48 hours, mark the final level. The topmost settled layer is clay. (Very fine clay particles can take up to 48 hours to fully settle. The water may still be slightly cloudy — that’s fine.)
Now measure the proportions. Ideal garden loam is roughly 40% sand, 40% silt, and 20% clay, but there’s a wide range that works well. What you’re really looking for is whether any single component dominates.
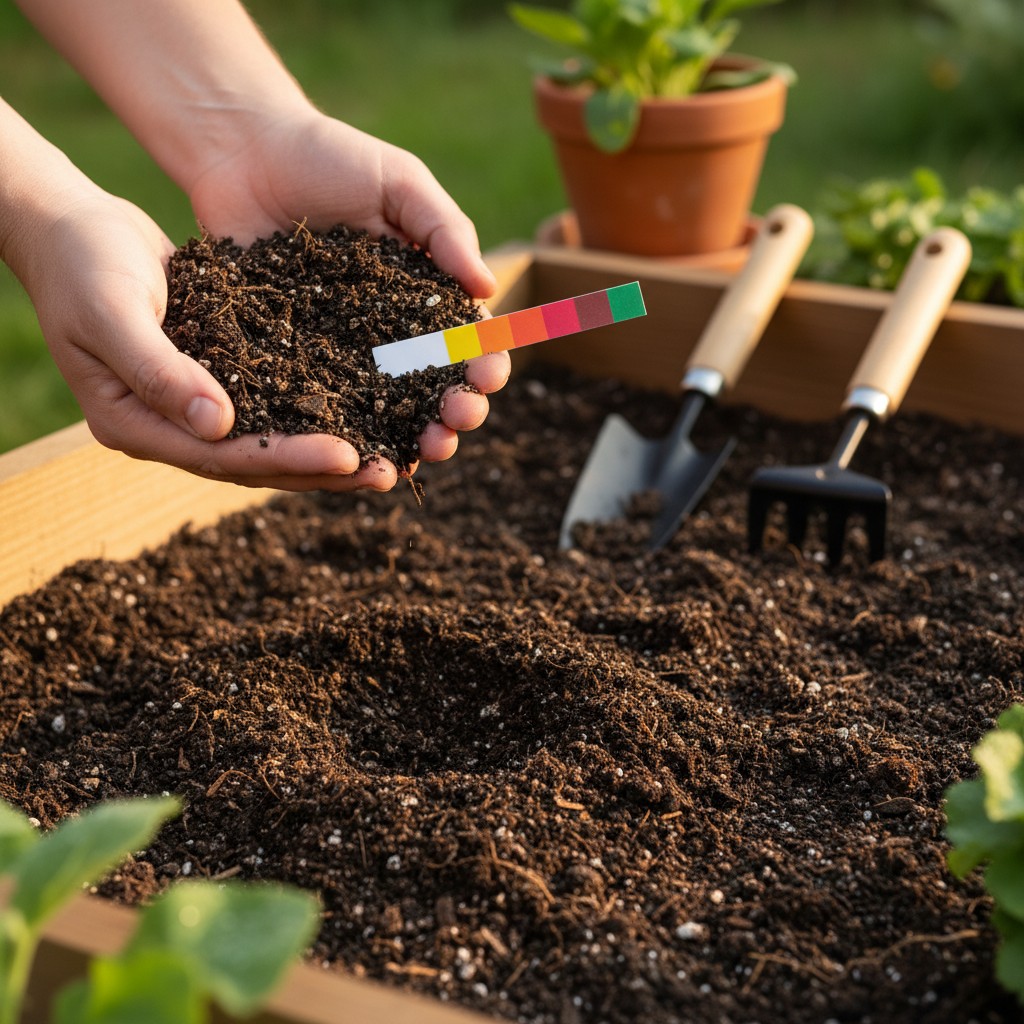
pH Test Strips
You can buy soil pH test strips or a simple pH test kit at any garden center for a few dollars. Mix a tablespoon of soil with distilled water, let it sit, then dip your strip.
Most vegetables prefer a pH between 6.0 and 7.0, with 6.5 being the sweet spot. Blueberries are the notable exception — they need acidic soil around 4.5–5.5.
Here’s what most guides won’t tell you: pH test strips give you a ballpark, not precision. They’re good for determining if your soil is strongly acidic, near neutral, or alkaline. For specific numbers, a lab test is more reliable. But strips are useful for quick checks and monitoring after you’ve amended.
The Earthworm Count
Dig a hole one foot square and one foot deep. Count the earthworms you find in the removed soil.
- 10+ worms: Healthy, biologically active soil with good organic matter
- 5–9 worms: Decent but could benefit from more organic matter
- Fewer than 5: Your soil likely needs significant organic matter additions
This isn’t a scientific analysis, but earthworm populations are a reliable indicator of overall soil biology. Healthy soil is alive, teeming with microorganisms that make nutrients available to plants. Earthworms are the visible ambassadors of that underground ecosystem.
Professional Soil Testing
For about $15–30, you can get a comprehensive soil analysis from your local university extension office or a private soil lab. In my experience, this is one of the best investments a gardener can make. You do it once every 3–5 years (or when starting a new garden area), and the results tell you exactly what your soil has, what it lacks, and what to add.
How to Collect a Good Sample
- Use a clean trowel or soil probe. Avoid galvanized tools, which can contaminate the sample with zinc.
- Take samples from 6–8 spots across the area you want to test, each from the top 6–8 inches of soil (the root zone for most vegetables).
- Mix all the sub-samples together in a clean plastic bucket. This composite sample gives a representative picture of the whole area.
- Take about a pint of the mixed soil and let it air-dry on a clean surface (not newspaper — the ink can affect results).
- Package it according to your lab’s instructions and send it off.
Test different garden areas separately if they have different soil types or histories. The bed that used to be a driveway is going to have different soil chemistry than the bed where you’ve been composting for five years.
What the Results Tell You
A standard soil test report includes:
- pH — The acidity or alkalinity of your soil, measured on a scale of 0 to 14 (7 is neutral). This is arguably the most important number on the report because pH controls nutrient availability.
- Macronutrients — Levels of nitrogen (N), phosphorus (P), and potassium (K). These are the big three that plants use in the largest quantities.
- Secondary nutrients — Calcium, magnesium, and sulfur levels.
- Micronutrients — Depending on the lab, you may also get iron, manganese, zinc, copper, and boron levels.
- Organic matter percentage — How much decomposed organic material is in your soil. Higher is generally better, with 3–5% being a good target for vegetable gardens.
- Recommendations — Most labs provide specific amendment recommendations based on your results and the crops you plan to grow. Follow these. They’ve done the math for you.
Understanding Soil pH: Why It Matters So Much
pH deserves its own section because it’s the single most impactful number in your soil test. Here’s the key concept: even if your soil contains plenty of nutrients, plants can’t access them if the pH is wrong.
At very low pH (strongly acidic, below 5.5), aluminum and manganese become overly available and can reach toxic levels, while phosphorus, calcium, and magnesium become locked up. At very high pH (alkaline, above 7.5), iron, manganese, zinc, and phosphorus become unavailable.
The 6.0–7.0 range is where most nutrients are simultaneously available. That’s why 6.5 is considered the universal sweet spot for vegetable gardens — it’s the pH where the maximum number of essential nutrients are accessible to plant roots.
Common Soil Amendments and When to Use Them
To Raise pH (Make Acidic Soil More Neutral)
Agricultural lime (calcium carbonate): The standard treatment for acidic soil. Apply rates based on your soil test — the amount needed depends on both your current pH and your soil texture (clay soils need more lime to shift the same number of pH points as sandy soils). Apply in fall so the lime has time to react with the soil over winter. It typically takes 2–3 months to fully adjust pH.
Dolomitic lime: Similar to regular lime but also contains magnesium. Use this if your soil test shows low magnesium alongside low pH. If magnesium is adequate, stick with calcitic lime to avoid magnesium excess.
Wood ash: Raises pH and adds potassium and trace minerals. Use sparingly — it acts quickly and it’s easy to overcorrect. A light dusting once a year is plenty. Never use ash from treated lumber, painted wood, or charcoal briquettes.
To Lower pH (Make Alkaline Soil More Acidic)
Elemental sulfur: Soil bacteria convert sulfur to sulfuric acid over time, lowering pH. This is a slow process — apply at least 3–6 months before planting. Rates depend on your soil test, but typically 1–2 pounds per 100 square feet for a modest adjustment. Acidifying soil is harder and slower than raising pH, which is worth knowing upfront.
Acidifying fertilizers: Ammonium sulfate and cottonseed meal have a gradual acidifying effect and are useful for maintaining lower pH around acid-loving plants like blueberries.
Peat moss: Naturally acidic (pH around 3.5–4.5). Working peat moss into the soil lowers pH while improving texture. However, environmental concerns about peat bog harvesting have led many gardeners to seek alternatives like coconut coir (which is pH-neutral and won’t affect acidity).
To Improve Soil Structure
Compost: The universal amendment. Compost improves drainage in clay soils, improves water retention in sandy soils, adds moderate nutrients, feeds soil biology, and increases organic matter. It also gently buffers pH toward neutral. There is almost no garden situation where adding compost makes things worse. Apply 1–3 inches annually and work it into the top few inches of soil.
Gypsum (calcium sulfate): Specifically useful for breaking up heavy clay soils without changing pH. Gypsum causes clay particles to clump together (flocculate), creating larger pore spaces for water and air movement. Apply 20–40 pounds per 1,000 square feet and work it into the soil. Results take several months. Note: gypsum is most effective in sodium-heavy clay soils — if your clay is not sodium-affected, compost may be more effective.
Coarse sand: Sometimes recommended for clay soil, but use caution. Adding a small amount of sand to clay creates something approaching concrete. If you go this route, you need a very large amount — at least a 2-inch layer worked deeply into the soil. In most cases, compost is a more practical solution.
To Add Specific Nutrients
- Bone meal: Slow-release phosphorus source. Good for root development and flowering.
- Blood meal: Fast-acting nitrogen. Use sparingly — it’s potent and can burn plants if over-applied.
- Greensand: Slow-release potassium and trace minerals. Takes months to years to fully break down.
- Kelp meal: Broad-spectrum trace minerals plus natural growth hormones. An excellent all-around soil conditioner.
- Rock phosphate: Very slow-release phosphorus for long-term soil building. Best applied to acidic soils where it breaks down more readily.
When and How to Amend
Fall is the best time for most soil amendments. Lime, sulfur, gypsum, and raw organic matter all need time to interact with the soil before planting season. Apply in fall, and by spring, the amendments have had months to do their work.
Compost can be added any time, but fall application lets it break down over winter and integrate with the soil structure. Spread 1–3 inches over your beds after fall cleanup and lightly fork it in, or let the freezing and thawing cycles work it in naturally.
Spring amendments work too, but go with faster-acting materials: finished compost (not raw organic matter), granular organic fertilizers, and well-aged manure. Avoid applying lime or sulfur in spring if you can help it — they may not have time to shift pH before planting.
A note on patience: Soil building is a multi-year process. You won’t transform poor soil into great soil in a single season. But consistent annual additions of compost and targeted amendments based on soil test results will produce noticeable improvement year over year. By year three, you’ll be gardening in significantly better soil than you started with.
Frequently Asked Questions
How often should I test my soil?
For an established garden, every 3–5 years is sufficient to track trends and catch problems before they become serious. Test more frequently (annually) if you’re actively correcting a known problem like pH imbalance, or if you’re gardening in a new area and still learning your soil’s characteristics. Always test before making significant amendments — guessing at amendment rates wastes money and can create new imbalances.
Can I add too much compost?
In theory, yes — extremely heavy annual compost applications over many years can lead to excess phosphorus accumulation, which can inhibit mycorrhizal fungi and contribute to water pollution via runoff. In practice, for most home gardeners adding 1–3 inches per year, this is not a concern. If your soil test shows phosphorus levels well above the recommended range, cut back on compost and use nitrogen-only amendments like blood meal or feather meal instead.
My soil is heavy clay. Is it hopeless?
Not at all. Clay soil actually has excellent nutrient-holding capacity and retains moisture well — it just needs help with drainage and workability. The fix is consistent, long-term addition of organic matter. Apply 3–4 inches of compost annually, consider adding gypsum if your soil is sodium-heavy, and avoid working clay soil when it’s wet (this creates compacted clods that take forever to break down). Raised beds filled with a good soil mix are also an effective workaround. Many of the most productive gardens I’ve seen are built on clay foundations that have been improved over years of composting.
Do I need to test soil in raised beds filled with purchased soil mix?
Yes, eventually. Fresh commercial soil mixes are usually well-balanced, but after a few years of growing and amending, nutrient levels shift. Test raised bed soil every 2–3 years, especially if you’re noticing plant performance issues. Raised beds also tend to become more alkaline over time as irrigation water (which is often slightly alkaline) accumulates minerals in the enclosed space. A pH check every couple of years catches this before it causes problems.