How to Render Lard and Tallow at Home: A Lost Kitchen Skill
Rendering fat at home was once as routine as baking bread. For most of the 20th century that knowledge was pushed aside by industrially processed vegetable shortening. Today, homesteaders and traditional cooks are reclaiming it, not out of nostalgia, but because home-rendered lard and tallow outperform their commercial replacements in flavor, smoke point, and shelf stability.
This guide walks through every step: what the different fats are, which rendering method to choose, how to execute both lard and tallow from start to finish, how to store what you make, and what to do with it once you have jars in the pantry.
What Are Lard, Tallow, and Suet, and How Do They Differ?
Lard, tallow, and suet are all rendered animal fats, but they come from different animals and different locations on the animal’s body, which gives each a distinct character in the kitchen.
Lard is rendered pork fat. The best quality, called leaf lard, comes from the fat surrounding the pig’s kidneys. It has an almost neutral flavor and produces the flakiest pie crusts. Back fat and fatback (from beneath the skin) render into a lard with a mild pork flavor, better suited to frying than baking. All pork fat is considered lard once rendered.
Tallow is rendered beef or mutton (sheep) fat. Beef tallow has a higher saturated-fat content than lard, which gives it a firmer texture at room temperature and a slightly higher smoke point. It is the traditional fat for deep-frying (McDonald’s used it for french fries until 1990) and is the base for many traditional soaps and candles.
Suet is specifically the raw, hard fat found around the kidneys and loins of beef or mutton, the same source material that becomes tallow once rendered. Unrendered suet is used directly in British recipes like suet pudding and, most famously, as a high-calorie winter bird feed. Once melted and strained, suet becomes tallow.
| Fat | Source | Texture at room temp | Flavor | Best uses |
|---|---|---|---|---|
| Leaf lard | Pork kidney fat | Soft, creamy white | Neutral | Pie crusts, pastry, frying |
| Back fat lard | Pork back/fatback | Soft, off-white | Mild pork | Frying, sautéing, biscuits |
| Beef tallow | Beef kidney/body fat | Firm, ivory to yellow | Mild beefy | Frying, roasting, soap, candles |
| Mutton tallow | Sheep kidney/body fat | Firm, white | Mild lanolin-like | Soap, candles, historical cooking |
Source: Harold McGee, On Food and Cooking (Scribner, revised 2004), pp. 534–537.
Is Dry Rendering or Wet Rendering Better for Home Use?
Both methods work, but they produce different results and suit different situations. Dry rendering gives cleaner, more neutral fat. Wet rendering is faster and more forgiving for beginners but produces fat with a slightly shorter shelf life.

Dry rendering melts fat without adding any water. You can do it on the stovetop over the lowest possible heat, or in an oven set to 225–250°F (107–121°C). The absence of water means no steam, which translates to purer fat and crispier cracklins (the browned bits left behind). Because water is the medium through which microbial growth occurs, dry-rendered fat also stores longer. The trade-off is that you must monitor heat carefully, too high and the fat browns, takes on a cooked flavor, and smokes.
Wet rendering adds water to the pot alongside the fat. The water keeps temperatures below 212°F (100°C) while the fat melts and separates. Once rendering is complete, you pour off the liquid, chill it, and lift the solidified fat layer from the top. Wet rendering is harder to overcook and works well when you have a large batch on a busy day. The downside: residual water remains in the fat unless you heat it gently a second time to evaporate it, and any water left behind accelerates rancidity.
For leaf lard meant for baking, dry rendering (oven method) is the gold standard. For large batches of tallow destined for soap or bird suet, wet rendering is efficient and perfectly acceptable.
Source: Hank Shaw, Hunt, Gather, Cook (Rodale, 2011), pp. 201–205.
How Do You Render Lard at Home Step by Step?
The dry oven method produces the clearest, mildest lard with the least hands-on attention. Plan for 2–3 hours total for a 3–5 lb batch of leaf lard or fatback.
What you need
- 3–5 lb raw pork fat (leaf lard or fatback), chilled or partially frozen
- Heavy oven-safe pot or Dutch oven (cast iron or enameled cast iron)
- Sharp knife and cutting board
- Fine-mesh strainer or colander
- Cheesecloth (at least 2 layers)
- Glass jars with tight lids (quart mason jars work well)
- Ladle or heat-safe pitcher for pouring
Step 1: Source and prep your fat
Ask your butcher or a local pig farmer for leaf lard or fatback. Many butchers freeze it or give it away since demand is low. Remove any meat scraps, membrane, or blood spots with a sharp knife, these cause off-flavors and promote rancidity. Chill the fat until firm but not frozen solid, then cut it into 1-inch cubes or run it through a meat grinder. Smaller pieces render faster and more evenly.
Step 2: Set up your oven
Preheat your oven to 225°F (107°C). Place the cubed fat into a heavy Dutch oven. Add 1/4 cup of water to the bottom of the pot, just enough to prevent scorching until the fat starts releasing. Place the pot uncovered in the oven.
Step 3: Low and slow rendering
After 30 minutes you will see the fat beginning to liquefy around the edges and the water starting to evaporate. Stir gently every 30–45 minutes to encourage even melting. The solid pieces (cracklins) will gradually shrink and turn golden-white. Rendering is complete when the cracklins are small, slightly golden, and floating freely in clear liquid fat, typically 2 to 2.5 hours for a 3–4 lb batch.
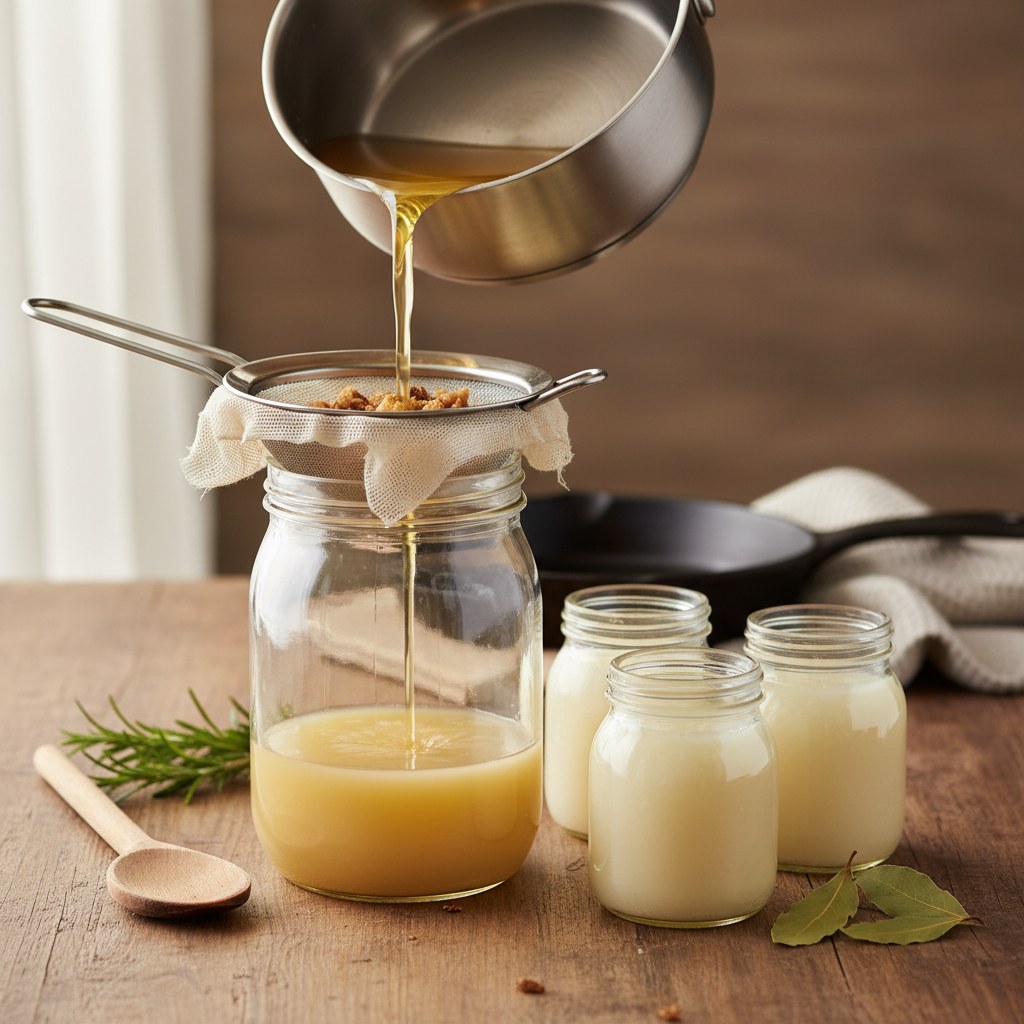
Step 4. Strain
Remove the pot from the oven. Line your strainer with 2 layers of cheesecloth and set it over a large heat-safe bowl or directly over your mason jars. Ladle the fat through the strainer slowly. The cheesecloth catches all solids. Save the cracklins, salted while still warm, they are an excellent snack or topping for cornbread.
Step 5: Cool and store
Let the strained liquid fat cool on the counter for 20–30 minutes, then pour into clean glass jars. Leave a 1-inch headspace if freezing. Seal and label with the date. The fat will turn opaque and creamy white as it cools and solidifies.
Source: Jennifer McLagan, Fat: An Appreciation of a Misunderstood Ingredient (Ten Speed Press, 2008), pp. 22–28.
How Do You Render Beef Tallow Step by Step?
Beef tallow rendering follows the same basic logic as lard but requires more time because beef kidney fat (suet) is denser and firmer than pork fat. A 5 lb batch takes 3–4 hours in the oven or on the stovetop at medium-low. The result is a firm, ivory-colored fat with a mild beef flavor and an excellent shelf life.
What you need
- 4–6 lb raw beef suet or beef kidney fat, chilled
- Heavy stockpot or Dutch oven
- Knife or meat grinder
- Cheesecloth and fine-mesh strainer
- Glass jars or food-grade containers
Step 1: Prepare the suet
Trim away any blood vessels, membrane, and red meat. For suet, the papery membrane pulls away by hand once you find an edge. Chilling the fat makes trimming much easier. Cut or grind into small pieces, 1/2 inch cubes or a coarse grind are both ideal. Finer pieces mean faster, more complete rendering.
Step 2: Choose stovetop or oven
Stovetop: Place the prepared fat in a heavy stockpot over the lowest heat setting. Stir every 20–30 minutes. This method lets you monitor more closely but requires you to stay nearby. Oven: Set to 225–250°F and place the pot inside, uncovered. Check every 45–60 minutes. Both methods produce good results; the oven is more hands-off.
Step 3: Render until the solids are golden
The process looks the same as lard: liquid fat accumulates while the solid pieces shrink and eventually brown slightly. Unlike pork fat, beef suet can leave slightly more connective tissue in the pot. You may need to render an additional 30–60 minutes compared to lard. Done when the solids are small, crispy, and floating freely.
Step 4: Double strain
Beef tallow benefits from a double strain. Strain first through a fine-mesh strainer to remove large solids, then strain again through 2 layers of cheesecloth. This second pass removes fine particles that would cloud the tallow and shorten its shelf life. Tallow should be clear golden-amber while still liquid; it turns a creamy ivory-white when solid.
Step 5. Pour, cool, and seal
Pour into jars while still liquid. Tallow sets up firmer than lard, so work relatively quickly before it begins to congeal. Cool at room temperature, then seal and refrigerate or freeze.
Source: Mary G. Enig, PhD, Know Your Fats (Bethesda Press, 2000), p. 118.
How Do You Strain and Store Rendered Fat Properly?
Proper straining and storage are what separate shelf-stable rendered fat that lasts a year from a batch that goes rancid within weeks. The goal is to remove all water and all solid particles, both accelerate oxidation and microbial activity.
Straining: Use at minimum a fine-mesh strainer lined with two layers of cheesecloth. For ultra-clear fat intended for baking or soap, add a layer of unbleached coffee filter over the cheesecloth. Work while the fat is still hot and liquid, it will solidify quickly as it cools, and forcing it through cheesecloth once semi-solid damages the filter and lets particles through.
Removing residual water: If you used the wet rendering method or suspect residual moisture, after straining, return the fat to a clean pot and heat gently over low heat for 5–10 minutes, stirring occasionally. You will see small bubbles as water evaporates. Once bubbling completely stops, the fat is dry. Allow to cool slightly before jarring.
Containers: Wide-mouth glass mason jars are ideal. They seal airtight, tolerate temperature swings without cracking, and let you see the color and condition of the fat at a glance. Avoid plastic: fat absorbs plastic compounds over time. Metal tins work for short-term use (a few weeks) but can impart a metallic taste.
Shelf life:
- Room temperature (well-rendered, dry, sealed): 3–6 months for lard; 6–12 months for tallow
- Refrigerator: 6–12 months for lard; up to 18 months for tallow
- Freezer: 1–2 years for both; freeze in small portions (1/2 cup jars) so you only thaw what you need
Signs of spoilage: Any sour, fishy, or paint-like smell (rancidity), visible mold, or yellow discoloration with an off smell means discard. Properly rendered fat should smell clean, neutral, or very faintly of the source animal.
Source: Sandor Ellix Katz, The Art of Fermentation (Chelsea Green, 2012), p. 411. (Katz discusses fat oxidation principles in the context of preserved foods.)
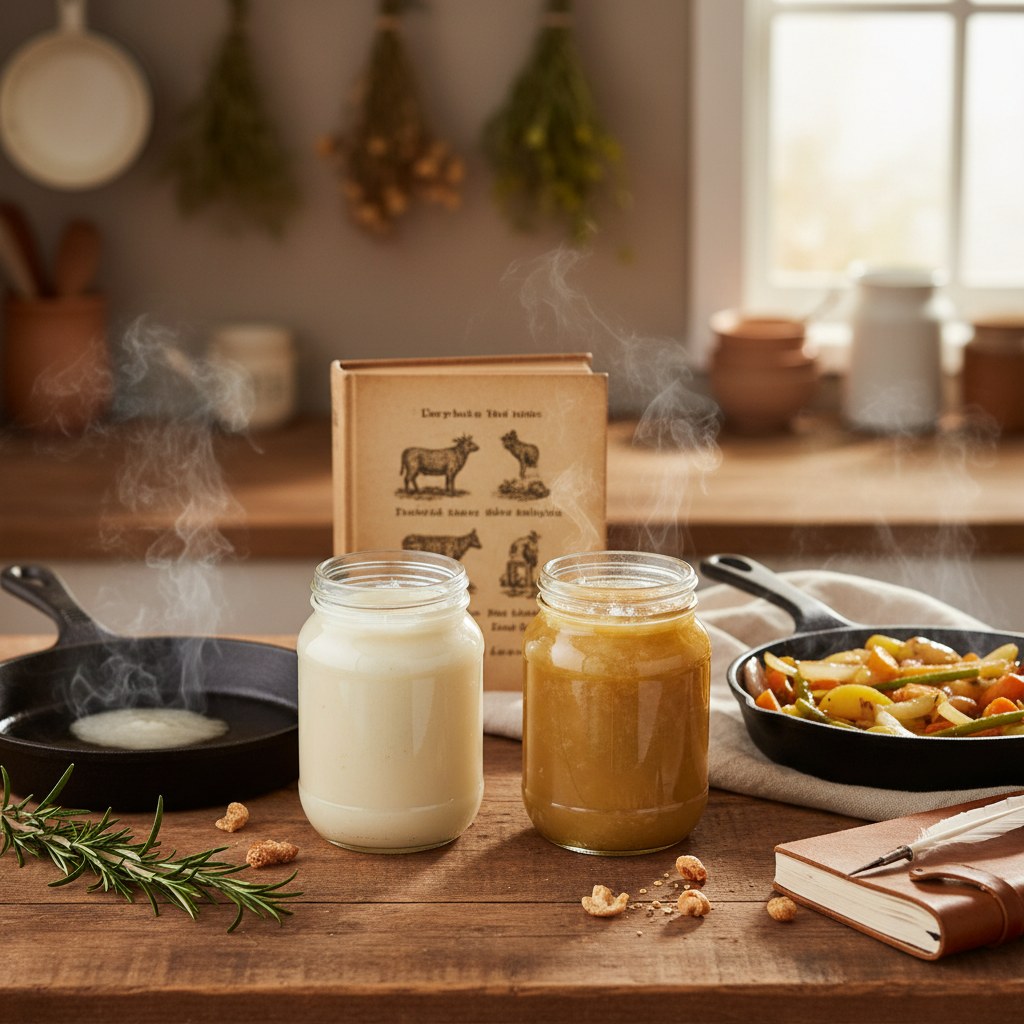
What Can You Do With Rendered Lard and Tallow?
Rendered fat is among the most versatile homestead products you can make. A single rendering session can stock your kitchen, your soap pot, your candle molds, and your bird feeders, all from fat that would otherwise be discarded.
Cooking and baking
Lard makes the flakiest pie crusts, biscuits, and tamale masa of any fat. Its smoke point (370–400°F for leaf lard) is well-suited to pan-frying and sautéing. Tallow’s higher smoke point (400–420°F) makes it excellent for deep-frying, potatoes fried in beef tallow have a flavor and texture that vegetable oil cannot replicate. Use either fat anywhere a recipe calls for shortening, butter (in savory applications), or vegetable oil at high heat.
Soap making
Tallow and lard are traditional soap bases because their fatty acid profiles produce hard bars with stable, conditioning lather. Tallow-based soap (combined with lye via cold-process saponification) is gentle, long-lasting, and nearly identical to the bar soap people used for centuries. If you want to dive deeper into cold-process soap making, our guide at How to Make Homemade Soap: A Beginner’s Guide to Cold Process Soap Making walks through every step including lye safety and the cure timeline.
Candles
Tallow candles were the dominant household light source for most of human history. Rendered tallow can be poured into molds around a cotton wick, producing slow-burning candles with a clean, faintly pleasant smell. For a modern variation that blends traditional and natural materials, the techniques in our DIY Beeswax Wraps article on working with natural waxes and fats apply to candle making as well.
Bird suet feeders
Raw or rendered suet is one of the highest-calorie foods you can offer winter birds, woodpeckers, nuthatches, chickadees, and starlings all favor it. To make a basic suet cake: melt 1 cup rendered tallow, stir in 1 cup peanut butter and 2 cups coarse cornmeal or oats, pour into a square mold or recycled mesh bag, and chill until firm. Hang from a tree branch in a suet cage. Unlike commercial suet cakes, home-rendered versions contain no preservatives or fillers.
Leather and tool conditioning
A thin coat of rendered tallow worked into leather boots, wooden tool handles, or cast iron cookware prevents drying and rust. It has been used as a metal lubricant and wood preservative for centuries and outperforms petroleum-based products for items that contact food.
Source: Rosamond Richardson, Country Kitchen (Trafalgar Square, 1998), pp. 112–117.
What Are the Most Common Rendering Mistakes to Avoid?
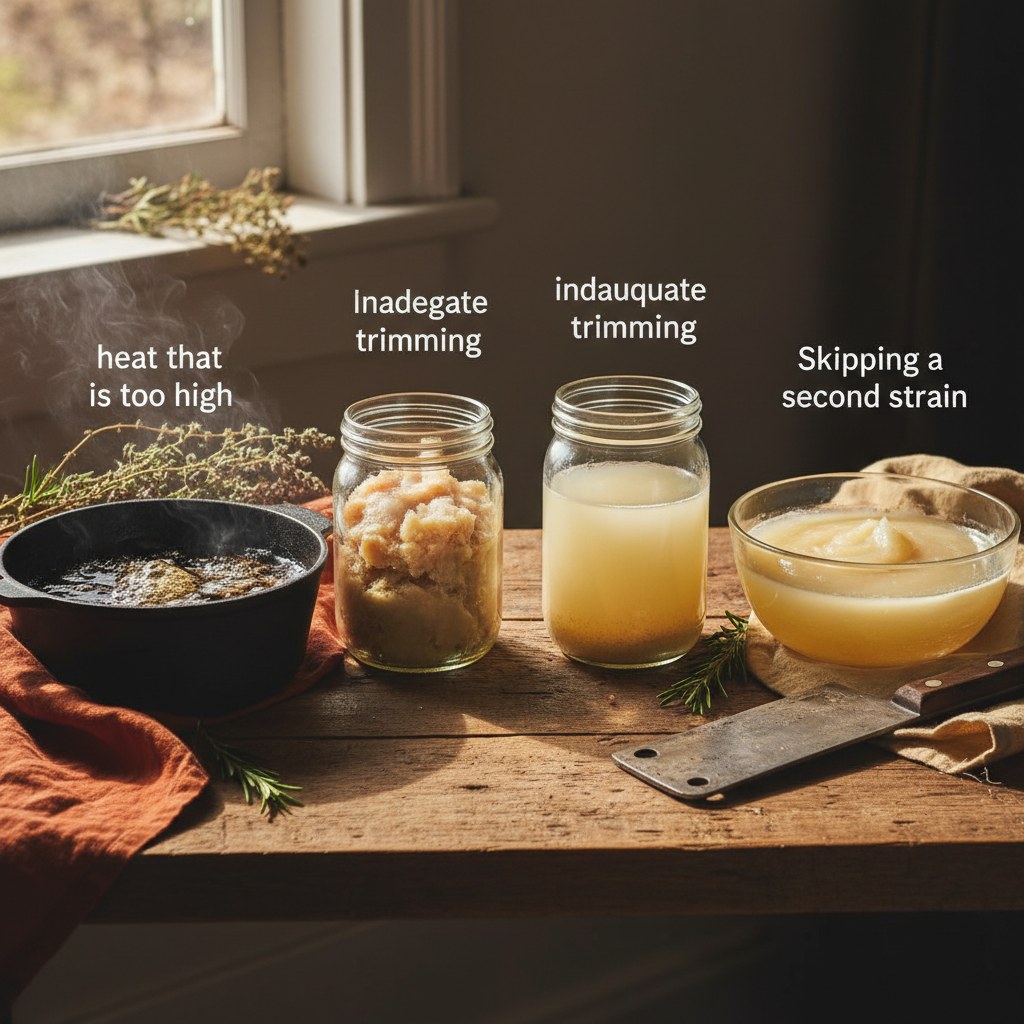
Most rendering failures come down to four problems: heat that is too high, inadequate trimming, skipping a second strain, and improper storage. Understanding each one prevents a wasted batch.
Heat too high. This is the single most common mistake. If fat renders at too high a temperature, the proteins in residual meat scraps brown and impart a cooked, greasy, or bitter flavor. Lard or tallow that smells “fried” was rendered too hot. Stick to 225–250°F in the oven or the lowest flame on the stovetop. It takes longer but produces clean, neutral fat.
Not trimming enough. Every piece of meat, blood vessel, or membrane left in the rendering pot becomes a source of flavor contamination and bacteria. Take an extra 15 minutes to trim carefully. This step alone separates excellent lard from mediocre lard.
Not grinding or cutting small enough. Large chunks of fat render unevenly, the outside liquefies while the inside remains solid. Cutting into 1-inch cubes minimum, or grinding to a coarse grind, ensures even heat penetration.
Rushing the strain. Pouring fat through a thin cheesecloth too fast pushes fine particles through into the jar. Go slowly. Use a ladle rather than pouring the whole pot at once. If the cheesecloth clogs, replace it rather than pushing through.
Storing with residual water. Water in rendered fat is the leading cause of early rancidity. If you hear any crackling or sputtering when you pour the fat, or if you can see small bubbles settling to the bottom of jars as they cool, return the fat to a clean pot and gently heat until the bubbling stops before re-jarring.
Using plastic containers long-term. Rendered fat absorbs compounds from plastic, especially over months in a warm pantry. Glass is non-negotiable for anything stored more than a week or two.
Source: Sandor Ellix Katz, The Art of Natural Cheesemaking (Chelsea Green, 2015); cross-reference with USDA guidelines on fat storage.
How Do Lard and Tallow Compare on Smoke Points and Nutrition?
The rehabilitation of animal fats in nutritional science has been significant since the late 2010s. Neither lard nor tallow is the artery-clogger they were portrayed as for decades, and both have practical cooking advantages over commonly used vegetable oils.
| Fat | Smoke point | Saturated fat % | Monounsaturated % | Polyunsaturated % | Vitamin D per Tbsp |
|---|---|---|---|---|---|
| Leaf lard (pork) | 370–400°F | ~39% | ~45% | ~11% | ~40 IU (pasture-raised) |
| Beef tallow | 400–420°F | ~50% | ~42% | ~4% | Trace |
| Butter (unsalted) | 300–350°F | ~63% | ~26% | ~4% | ~9 IU |
| Refined coconut oil | 350–400°F | ~87% | ~6% | ~2% | 0 |
| Extra virgin olive oil | 375°F | ~14% | ~73% | ~11% | 0 |
| Refined vegetable (soy) | 450°F | ~15% | ~23% | ~58% | 0 |
The high polyunsaturated content of refined vegetable oils makes them prone to oxidation at high temperatures, generating potentially harmful aldehydes. Saturated and monounsaturated fats, the majority of both lard and tallow, are more stable under heat. A 2018 analysis in the journal ACTA Scientific Nutritional Health confirmed that repeatedly heated vegetable oils produce significantly higher aldehyde levels than animal fats under the same conditions.
Pasture-raised lard is also one of the richest non-fish dietary sources of vitamin D, a nutrient the majority of Americans are deficient in, with roughly 40 IU per tablespoon depending on the animal’s sun exposure. Conventionally raised confinement pork fat contains little to none.
Sources: USDA FoodData Central (fdc.nal.usda.gov); De Alzaa F. Et al., “Evaluation of Chemical and Physical Changes in Different Commercial Oils during Heating,” ACTA Scientific Nutritional Health 2 (6), 2018.
Frequently Asked Questions
Can I render fat in a slow cooker?
Yes. Set the slow cooker to LOW, add the trimmed fat pieces, and leave the lid slightly ajar to let steam escape. Stir occasionally. Rendering takes 4–6 hours on this setting. Strain the same way as the oven method. The slow cooker is a good option if your stovetop runs hot or you want a fully hands-off approach.
Why did my lard turn out yellow or tan instead of white?
Tan or yellow lard was rendered at too high a temperature. The proteins from residual meat scraps browned slightly, tinting the fat. It is still safe to eat, but it will have a more pronounced pork flavor. For snow-white leaf lard with a neutral flavor, trim aggressively and keep the oven at 225°F, not higher.
How do I know if rendered fat has gone rancid?
Rancid fat has a sharp, sour, or paint-like smell, unmistakable once you know it. Fresh rendered fat smells clean and faintly of the source animal (mild pork for lard, mild beef for tallow). If in doubt, smell before every use. Rancid fat is not dangerous in small amounts but tastes terrible and should be composted or discarded.
Where can I buy raw fat for rendering?
Local butcher shops are the best source. Ask for “leaf lard” (pork kidney fat), “fatback” (pork back fat), or “beef suet.” Many butchers freeze these scraps or give them away because demand is low. Farmers markets with pork or beef vendors are another reliable source. Grocery store suet packages (often sold near the meat counter in winter) also work for tallow.
Is home-rendered fat safe to eat? What about lye for soap?
Home-rendered fat is perfectly safe to eat when prepared hygienically, trim carefully, render fully, strain well, and store in clean sealed containers. It has been a staple food for thousands of years. For soap making, lye (sodium hydroxide) is required for saponification, but no lye remains in the finished cured soap bar, it is completely consumed by the reaction. Handle lye with rubber gloves and eye protection during the soap-making process.